Passive Income Automation for Solopreneurs: 5 Workflows That Run Without You
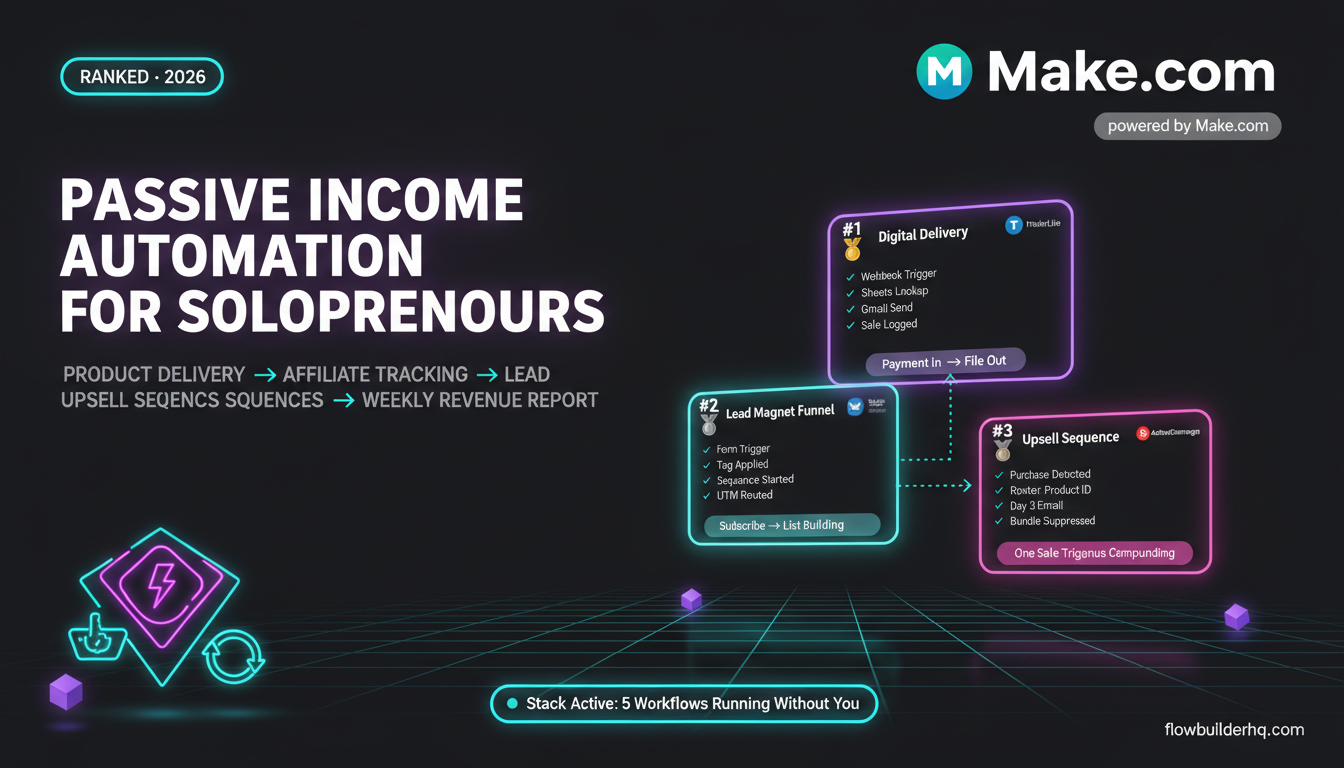
These aren’t passive income myths — they’re actual Make.com scenarios. Real trigger-to-action chains that handle digital product delivery, affiliate tracking, email sequences, and lead magnet funnels while you’re doing something else. Passive income automation for solopreneurs isn’t about setting up something once and forgetting it. It’s about building systems where the repetitive, transactional work happens without your hands on the keyboard.
Every workflow below runs on Make.com — starting at $9/month on the Core plan, with a free tier covering 1,000 operations per month if you’re just getting started. The scenarios are real. The ops counts are realistic. And there’s at least one thing in each that catches people off guard the first time they build it.
What Makes a Workflow Actually “Passive”
A workflow earns the word “passive” when it runs on a trigger — not on you opening a tab. Payment received → product delivered. Form submitted → sequence started. Link clicked → data logged. That’s the pattern. You build the logic once; the automation fires every time the condition is met.
The failure mode most solopreneurs hit is building workflows that still require them to check something, approve something, or copy something. Those aren’t passive — they’re just delayed manual work. The five workflows below are designed to close that loop completely.
If you’re still figuring out which automation tool fits your situation, the automation tool decision framework is worth reading before committing to a stack.
Workflow 1: Automated Digital Product Delivery
The Passive Income Automation Scenario
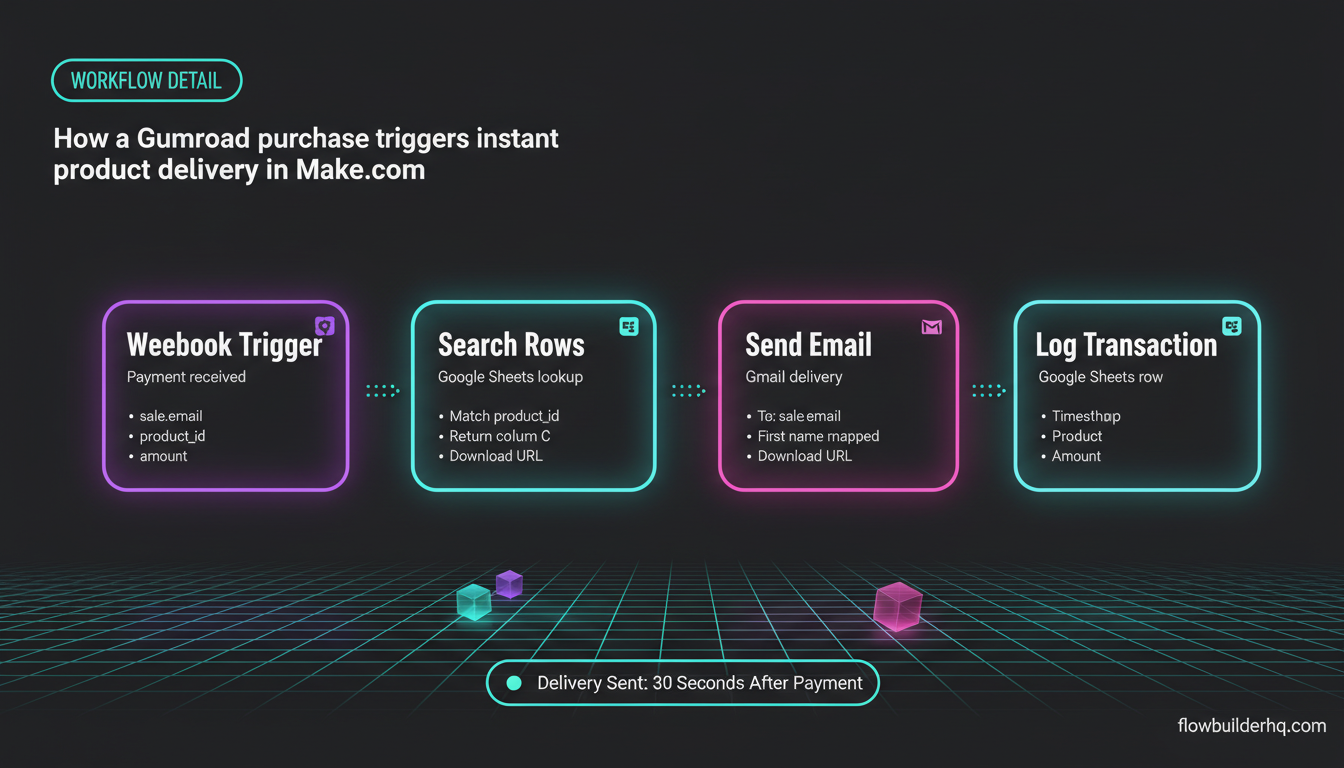
Someone buys your PDF, template pack, or course on Gumroad, ThriveCart, or Stripe. Make.com catches the webhook, looks up the product ID, grabs the correct download link from a Google Sheet or Airtable row, and fires a personalized email with the link — all within 30 seconds of payment confirmation.
No Zapier. No third-party delivery plugin. No you.
How It’s Built
- Set a webhook trigger in Make.com. Point your payment platform’s webhook URL at it.
- Add a Google Sheets “Search Rows” module to look up the product name from the webhook payload and return the download URL stored in column C.
- Add a Gmail or SMTP “Send Email” module. Map in the buyer’s email, their first name (if your payment platform passes it), and the download URL from step 2.
- Optionally: add a Google Sheets “Add Row” module to log the transaction — timestamp, email, product, amount.
Total modules: 3–4. Operations per purchase: 3–4. On the free plan at 1,000 ops/month, that covers 250+ sales before you hit the ceiling. Core plan at $9/month handles 10,000 ops — room for a real catalog.
The thing that catches people: Webhook payload field names vary by payment platform. Gumroad calls the buyer’s email sale.email. Stripe calls it data.object.customer_email. Map these wrong once and you’ll send a blank email. Always run a test purchase first and inspect the raw payload in Make.com’s execution log before going live.
For a deeper look at how Make.com handles course and product delivery workflows, the post on Make.com for course creators covers student onboarding in the same stack.
Workflow 2: Affiliate Link Click Tracking in Google Sheets
The Passive Income Automation Scenario
You have affiliate links scattered across blog posts, email sequences, and social bios. You want to know which placements convert — without logging into five different affiliate dashboards every morning. This workflow uses a Make.com webhook as a redirect proxy to log every click before forwarding the visitor.
How It’s Built
- Create a Make.com custom webhook. This becomes your tracking URL — e.g.,
https://hook.make.com/abc123?product=toolname&placement=email. - Add a Google Sheets “Add Row” module to log: timestamp, product parameter, placement parameter, and the IP hash or user agent if you want rough deduplication.
- Add an HTTP “Make a Request” module or a Router to redirect the visitor to the real affiliate URL based on the
productparameter. - Build a simple Google Sheets dashboard with a COUNTIF per product/placement combination to see click distribution at a glance.
This won’t replace a full affiliate dashboard, but it gives you first-party data you actually own — and it costs nothing beyond your Make.com plan ops.
The thing that catches people: Make.com webhooks don’t natively return an HTTP redirect (302). The visitor lands on your webhook URL and sees a blank page unless you configure the webhook response correctly. In the webhook trigger settings, set the response to a custom body with a Location header and a 302 status code. This is a one-minute fix but a 100% blocker if you skip it.
If you want to see how webhooks work mechanically before building this, the Make.com webhooks tutorial walks through the fundamentals step by step.
Workflow 3: Lead Magnet Funnel → Email Sequence Trigger
The Passive Income Automation Scenario
Someone downloads your free resource — a checklist, swipe file, mini-course, or template. That action triggers a multi-step email sequence designed to move them toward a paid offer. The sequence fires on a schedule, stops if they buy, and tags them in your CRM when they click a specific link.
This is core passive income automation for solopreneurs. One lead magnet can drive revenue for months after you build the funnel.
How It’s Built
- Form submission trigger — use Typeform, Tally, or a native form on your landing page. Make.com watches for new submissions.
- Email platform “Add Subscriber” module — add the lead to MailerLite or ActiveCampaign with a specific tag (e.g., “lead-magnet-checklist”).
- Email platform “Create Automation” trigger — most email platforms let you start an automation when a tag is applied. Map the tag from step 2.
- Google Sheets log — record the lead: timestamp, email, source form, tag applied.
- Conditional branch (Router) — if the form includes a UTM source field, route to different tag assignments to segment by traffic source.
MailerLite’s Growing plan starts at $10/month for up to 500 subscribers and handles sequences natively once the subscriber is added. ActiveCampaign’s Starter plan is $15/month at 1,000 contacts. Either works. The Make.com scenario just handles the handoff and logging.
The thing that catches people: Email platforms have rate limits on their APIs. If you’re running a high-traffic lead magnet and 200 people sign up in an hour, Make.com will batch the requests. Set error handling on the email module with a retry policy — otherwise failed adds disappear silently. The Make.com error handling tutorial covers exactly this scenario.
For a complete build of this specific workflow, there’s a dedicated post on automating lead magnet delivery with Make.com that goes step-by-step.
Every workflow in this guide is built on Make.com. The free tier covers 1,000 operations a month — enough to follow along and build your first automation today.
Try Make.com free →Some links are affiliate links — we only recommend tools we build with ourselves.
Workflow 4: Evergreen Upsell Email After Digital Purchase
The Passive Income Automation Scenario
Someone buys your $27 template pack. Three days later, they automatically get an email about your $97 bundle. Seven days later, a case study email. If they click the buy link, they get tagged and the sequence stops. If they buy, the upsell sequence stops AND they get the bundle delivered via Workflow 1.
This is where passive income automation for solopreneurs starts compounding. One purchase event kicks off a chain that handles delivery, upsell nurture, and purchase detection — with no manual intervention at any stage.
How It’s Built
- Purchase webhook trigger (same setup as Workflow 1). Parse product ID.
- Router — branch by product ID. Route “template-pack” purchases to the upsell sequence path. Route “bundle” purchases to the delivery-only path.
- Email platform: add subscriber to upsell sequence with a 3-day delay before email 1.
- Second Make.com scenario (runs separately) — triggered by a “bundle purchased” webhook. This scenario applies a “bundle-buyer” tag to the contact, which your email platform uses to suppress the upsell sequence.
- Google Sheets logging throughout — product purchased, email entered, upsell sequence started, upsell sequence suppressed.
The thing that catches people: The suppression logic requires your email platform to stop the sequence when the tag is applied — not when Make.com fires. Test this manually: buy the bundle mid-sequence and confirm the next email doesn’t send. Some email platforms suppress immediately; others only check at sequence start. Know which behavior yours has before you go live.
If you’re building out the full product delivery side of this, the automation tools for online course creators post covers the broader stack that sits around these workflows.
Workflow 5: Recurring Revenue Report — Automated Weekly Summary
The Passive Income Automation Scenario
Every Monday at 8am, Make.com pulls last week’s sales data from your Google Sheet (populated by Workflows 1 and 4), calculates revenue by product, compares it to the prior week, and emails you a plain-text summary. No dashboard to open. No manual tallying.
This isn’t income-generating in itself — but it closes the loop on the passive income stack. You built systems that earn without you. This workflow makes sure they’re actually working without requiring you to check five places to find out.
How It’s Built
- Schedule trigger — set to run every Monday at 8am in your timezone.
- Google Sheets “Get Range” module — pull all rows from the past 7 days. Use a filter on the timestamp column:
timestamp >= DATE(TODAY()-7). - Aggregator module — sum revenue by product name. Make.com’s built-in numeric aggregator handles this without any code.
- Gmail “Send Email” module — format the aggregated data into a plain-text email body. Map in product names, weekly totals, and a calculated change from the prior week row in your Sheet.
Operations: roughly 10–20 per run depending on how many rows you’re pulling. At once per week, that’s under 100 ops/month — negligible on any paid plan.
The thing that catches people: The date filter in Google Sheets via Make.com uses the Sheets serial date format, not a standard timestamp string. If your log uses ISO timestamps (2026-01-20T08:00:00Z), you’ll need a Make.com “Parse Date” function before the comparison, or your filter returns nothing. Format your log timestamps consistently from day one — it saves a debugging session later.
For building out the full Google Sheets reporting layer, the Google Sheets reporting with Make.com post covers the aggregator and filter patterns in detail.
Putting the Stack Together
These five workflows are designed to connect. Workflow 1 delivers the product and logs the sale. Workflow 4 picks up that log and routes to upsell sequences. Workflow 2 tracks which affiliate placements drove traffic to the offer. Workflow 3 fills the top of the funnel. Workflow 5 tells you weekly whether it’s working.
That’s a full passive income automation stack for solopreneurs — built on Make.com, Google Sheets, and whatever email platform you already use.
The workflow automation mistakes solopreneurs make is worth a read before you go live with any of these — specifically the section on error handling, which will save you the most pain.
Total Make.com cost for all five workflows running simultaneously: Core plan at $9/month comfortably handles the operations. If you’re processing more than a few hundred sales per week, the Pro plan at $16/month gives you more headroom and parallel execution.
One more structural thing: don’t build all five at once. Start with Workflow 1 — the delivery loop. Run it live for a week. Then add Workflow 3. Layer in the rest once you trust the foundation. Automation built in sequence is automation that actually stays running.
Ready to start? Try Make.com free — 1,000 ops/month costs nothing, and Workflow 1 alone fits comfortably inside that limit.
If you’re evaluating Make.com against other tools before committing, the Make.com vs Zapier pricing comparison runs the real numbers at scale so you’re not guessing.
And if you want the official documentation on Make.com’s webhook and HTTP module configuration — which matters for Workflows 1 and 2 specifically — the Make.com webhooks documentation is the right starting point.
For background on how email automation sequences work at the platform level, MailerLite’s automation feature docs show exactly what triggers and conditions are available before you build the Make.com handoff.
And if you need a reference on how Stripe structures its webhook payloads — which affects Workflow 1 directly — the Stripe’s GitHub SDK documentation covers every event object field.
Building this yourself? Get the workflow pack.
5 ready-to-import n8n workflows — lead capture, invoicing, content repurposing, onboarding, social posting. Free.