How to Use Make.com With Google Sheets as a Lightweight Database (Free Ops Setup for Solopreneurs)
If you’ve been eyeing Airtable or Notion as your data layer but keep balking at the monthly cost, this post is for you. Learning how to use Make.com with Google Sheets as a lightweight database means you can run a functional ops setup — lead tracking, content pipelines, webhook logging — for free. No $20/seat Airtable bill. No Notion Business tier. Just a spreadsheet you already have and an automation platform that connects to everything.
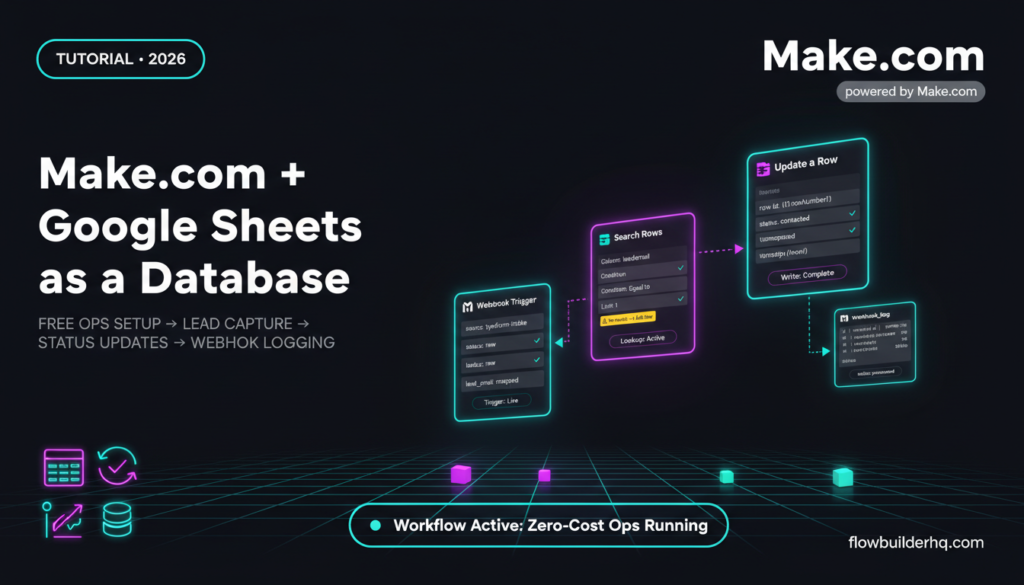
This tutorial walks through three real workflows: capturing leads into a Sheet, updating row status as a record moves through a pipeline, and logging webhook payloads for debugging. These are the exact patterns that cover 80% of what solopreneurs actually need a database for.
If you don’t have a Make.com account yet, grab the free tier — it includes 1,000 operations per month — at Make.com (free plan).
Why Google Sheets Works as a Database for Most Solopreneurs
Dedicated database tools like Airtable are genuinely better for complex relational data. But for most solopreneur use cases, “better” doesn’t justify the cost difference. Airtable’s free tier is limited to 1,000 records per base as of 2026. Their Team plan is $20/seat/month. Google Sheets is free, unlimited rows for practical purposes, and already inside your Google Workspace.
What makes Sheets work as a database in Make.com is the module set: Search Rows to look up records, Add a Row to insert new ones, and Update a Row to change values in place. These three modules handle the read/write operations you need for a functional ops layer. If your data doesn’t need relational joins or formula-heavy computed fields, Sheets will handle it.
For context on when Airtable does make sense as a step up, see our comparison of Make.com vs Airtable — but finish this tutorial first.
Setting Up Your Google Sheet as a Structured Database
Before touching Make.com, your Sheet needs to be structured correctly. Make.com reads your header row as column names, so naming matters.
Sheet Structure Rules
- Row 1 is always headers. Make.com uses row 1 as column names. Never leave it blank or use merged cells.
- No spaces in column headers. Use underscores or CamelCase:
lead_emailnotLead Email. Spaces cause mapping issues in certain modules. - Add a unique ID column. Call it
row_idorid. You’ll populate this with a timestamp or auto-increment via Make.com. This is how you reliably target a row for updates later. - Add a
statuscolumn. Every pipeline-style Sheet needs one. Values likenew,contacted,closedare what your Make.com logic will read and write. - Keep one Sheet per data type. Don’t combine leads and content items in the same tab. Make.com connects to a specific spreadsheet + tab combination — clean separation makes scenarios much easier to read.
Example header row for a lead capture Sheet:
id | timestamp | lead_name | lead_email | source | status | notesExample header row for a content pipeline Sheet:
id | created_date | title | format | status | publish_date | urlHow to Use Make.com With Google Sheets: Workflow 1 — Lead Capture
This is the most common pattern: something triggers (a form submission, a webhook, an email), and a new row gets written to your Sheet. Here’s how to build it with a Typeform trigger, but the Google Sheets side is identical regardless of your trigger source.
Step 1: Connect Google Sheets in Make.com
- Open Make.com and create a new scenario.
- Add your trigger module first (Typeform, Webhooks, Gmail — whatever your source is). For this workflow, use Typeform → Watch Responses.
- Add a second module: search for Google Sheets and select Add a Row.
- Connect your Google account when prompted. Make.com requests only the Sheets scope — it won’t touch your Drive or Docs unless you add those modules separately.
- Select your spreadsheet from the dropdown, then select the correct sheet tab.
Step 2: Map the Fields
Once the Sheet tab is selected, Make.com reads your header row and presents each column as a mapping target. Map your trigger output to the right columns:
id→ Use{{now}}formatted as a Unix timestamp, or use Make.com’s built-in{{formatDate(now; "X")}}to get a numeric ID. It’s not a true UUID but it’s unique enough for most ops use cases.timestamp→{{formatDate(now; "YYYY-MM-DD HH:mm:ss")}}lead_name→ Map from your trigger’s name fieldlead_email→ Map from your trigger’s email fieldsource→ Hard-code this as a text value, e.g.,typeform-intakestatus→ Hard-code asnew
Step 3: Run Once and Verify
Click Run once in Make.com, submit a test form entry, and check your Sheet. If the row appears, the connection works. If you see a blank row or misaligned data, the most common cause is a mismatch between your header column names and what Make.com detected — go back to the Add a Row module and re-select the Sheet tab to force a refresh of the column list.
For a deeper look at building these intake workflows, the Typeform + Make.com intake workflow guide covers the trigger side in detail.
Workflow 2 — Updating Row Status With Search Rows + Update a Row
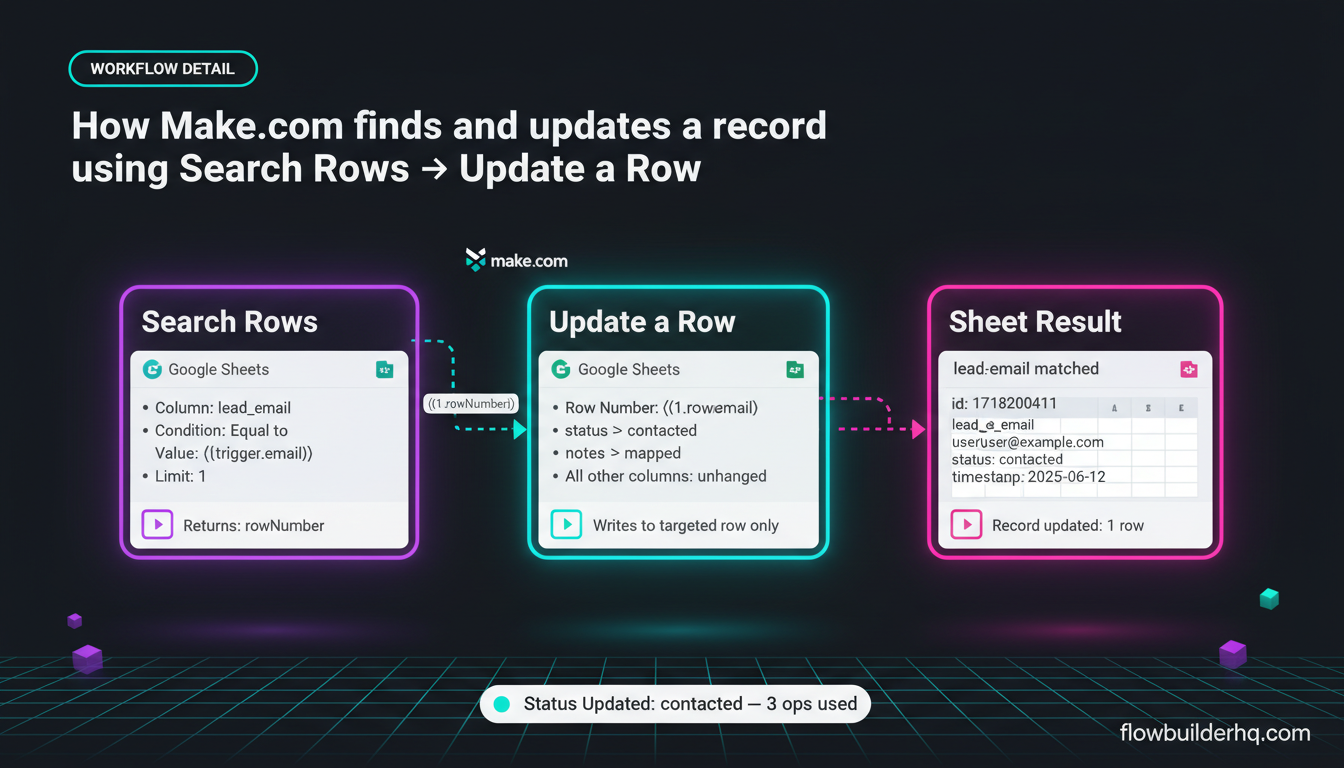
This is the pattern that makes Google Sheets actually behave like a database. You look up a record by a known value, get its row number, and then write new data back to that specific row. The two modules you need are Search Rows and Update a Row.
Step 1: Add the Search Rows Module
- In your scenario, add a Google Sheets → Search Rows module after your trigger.
- Connect to your spreadsheet and tab.
- In the Filter field, set: Column =
lead_email, Condition =Equal to, Value = the email from your trigger (e.g., the email that just came in from a webhook or email parser). - Set Limit to
1— you want the first matching row, not all of them.
Step 2: Add the Update a Row Module
- Add Google Sheets → Update a Row after Search Rows.
- In the Row Number field, map
{{1.rowNumber}}— this is the row number returned by Search Rows. The1refers to the module number of your Search Rows step; adjust if yours is a different number. - Map only the columns you want to change. Set
statusto your new value, e.g.,contacted. - Leave all other columns blank — Update a Row only writes to fields you explicitly map. It won’t overwrite your existing data in unmapped columns.
Common Error: “No rows found”
If Search Rows returns nothing, the scenario stops (or errors, depending on your error handler). Add a Router after Search Rows with two branches: one for when a row is found, one for when it isn’t. In the “not found” branch, use Add a Row instead — this gives you an upsert pattern without a real database.
On error handling in Make.com generally, the Make.com error handling tutorial covers the router and break/ignore/retry options in detail.
Workflow 3 — Logging Webhook Payloads
Webhook debugging is one of the most underrated uses for a Sheets database layer. When you’re receiving payloads from external tools and something breaks at 2am, having a log row in a Sheet is faster to check than digging through Make.com’s execution history — especially on the free plan where history is limited.
Step 1: Set Up Your Log Sheet
Create a new tab called webhook_log. Headers:
id | received_at | source | payload_raw | status | notesStep 2: Add a Google Sheets Add a Row Module After Your Webhook Trigger
- Add Google Sheets → Add a Row as the first action after your Webhooks → Custom webhook trigger.
- Map
idto{{formatDate(now; "X")}}. - Map
received_atto{{formatDate(now; "YYYY-MM-DD HH:mm:ss")}}. - Map
sourceto a hard-coded label likestripe-webhookortypeform-webhook. - Map
payload_rawto{{toString(1.body)}}— this dumps the entire webhook body as a string into the cell. - Map
statustoreceived.
Now every incoming webhook gets a row. You can later add an Update a Row step at the end of your scenario to flip status to processed or error depending on the outcome. This gives you a basic audit trail without paying for a database.
For more on working with Make.com webhooks, the Make.com webhooks beginner tutorial walks through the full custom webhook setup.
The Three Modules You’ll Use 90% of the Time
| Module | What It Does | When to Use It |
|---|---|---|
| Add a Row | Inserts a new row at the bottom of the Sheet | Creating new records (leads, log entries, pipeline items) |
| Search Rows | Finds rows matching a filter condition | Looking up existing records before updating them |
| Update a Row | Writes new values to specific columns in an existing row | Changing status, adding notes, updating timestamps |
There are also Get a Row (fetch by row number directly) and Delete a Row modules, but those come up far less frequently. Most real workflows are a combination of the three above.
Operations Cost: What This Actually Consumes on Make.com’s Free Plan
Make.com counts every module execution as one operation. For the lead capture workflow above (trigger + Add a Row), that’s 2 operations per lead. For the status update workflow (trigger + Search Rows + Update a Row), that’s 3 operations per update. The free plan gives you 1,000 operations per month, which covers roughly 300–500 full read-write cycles.
If you’re processing more than that, the Core plan is $9/month for 10,000 operations. For most solopreneurs running these lightweight database workflows, that’s the ceiling you’ll hit after you’ve genuinely outgrown the free tier. See a full breakdown of Make.com’s pricing and operation counts before upgrading.
For comparison, Make.com vs Zapier on pricing shows why Make.com’s operation model is significantly cheaper at this scale — Zapier’s Starter plan is $19.99/month for 750 tasks, which is more money for fewer executions.
Practical Limits of Google Sheets as a Database
This setup works well up to a few thousand rows and a handful of concurrent scenarios. Past that, you’ll start hitting issues:
- Search Rows scans the entire sheet. On a 10,000-row Sheet, this is slow. If your lookup is time-sensitive, you need a proper indexed database.
- No relational data. You can’t do a proper JOIN across two Sheets. You can fake it with two Search Rows modules, but it’s messy and doubles your operation count.
- Concurrent writes can collide. If two scenarios try to add a row at the same millisecond, Sheets doesn’t have transaction locking. For low-volume workflows this is theoretical. At scale it’s real.
- Cell value limits. Google Sheets cells cap out at 50,000 characters. For most logging use cases this is fine, but if you’re dumping large JSON payloads, you’ll hit it.
If you’re already thinking you need more, using Make.com with Notion gives you a more structured data layer with relational properties, still without an Airtable bill.
Putting It Together: A Simple Content Pipeline Ops Sheet
Here’s a concrete end-to-end use case. You create content ideas in a Google Form (or manually in the Sheet). Make.com monitors the Sheet for rows where status = draft_ready, runs an AI module to generate a social post from the title, then updates the row with the generated content and flips status to social_queued.
Scenario Structure
- Google Sheets → Watch Rows — triggers when a new row is added where
statusisdraft_ready. Set the trigger to run every 15 minutes. - OpenAI or Claude module — prompt: “Write a LinkedIn post based on this article title: {{1.title}}”
- Google Sheets → Update a Row — write the generated post to a
social_postcolumn, updatestatustosocial_queued.
The Watch Rows trigger in Make.com only picks up rows it hasn’t processed before (it tracks position). This means you get idempotent processing without building deduplication logic yourself — a legitimate advantage over building a similar flow from scratch in n8n.
If you’re building AI into this pipeline, the Claude API guide for solopreneurs covers how to connect Claude to Make.com scenarios for text generation tasks like this.
For more practical workflow ideas built around this kind of Sheets-as-database pattern, the Make.com Google Sheets integration tutorial covers three more real workflows including a client-reporting use case.
What You Need to Make This Work
- A Google account with Sheets access (free)
- A Make.com account — free tier is enough to start (register here)
- Your trigger source connected in Make.com (Typeform, a custom webhook, Gmail, etc.)
- Your Sheet structured with row 1 as headers, an ID column, and a status column
That’s the full stack. No paid database. No monthly Airtable seat. If you already have a Make.com account and a Google account, the cost to run these workflows is literally zero until you cross 1,000 operations per month.
If you’re new to building scenarios in Make.com entirely, start with how to build a Make.com scenario from scratch before tackling the multi-module workflows here.
And if you want to compare the full Make.com module library against what you get in similar tools, the Make.com vs Pabbly Connect comparison breaks down where each tool’s data handling differs in practice.
The core idea here is simple to execute: structure your Sheet correctly, use Search Rows to find records and Update a Row to change them, and you have a functional ops database that costs nothing to run. Most solopreneurs don’t need more than this for the first year of automation work.
Building this yourself? Get the workflow pack.
5 ready-to-import n8n workflows — lead capture, invoicing, content repurposing, onboarding, social posting. Free.