How to Automate Invoicing with Make.com (Stripe and PayPal)
What You’ll Have Running After This
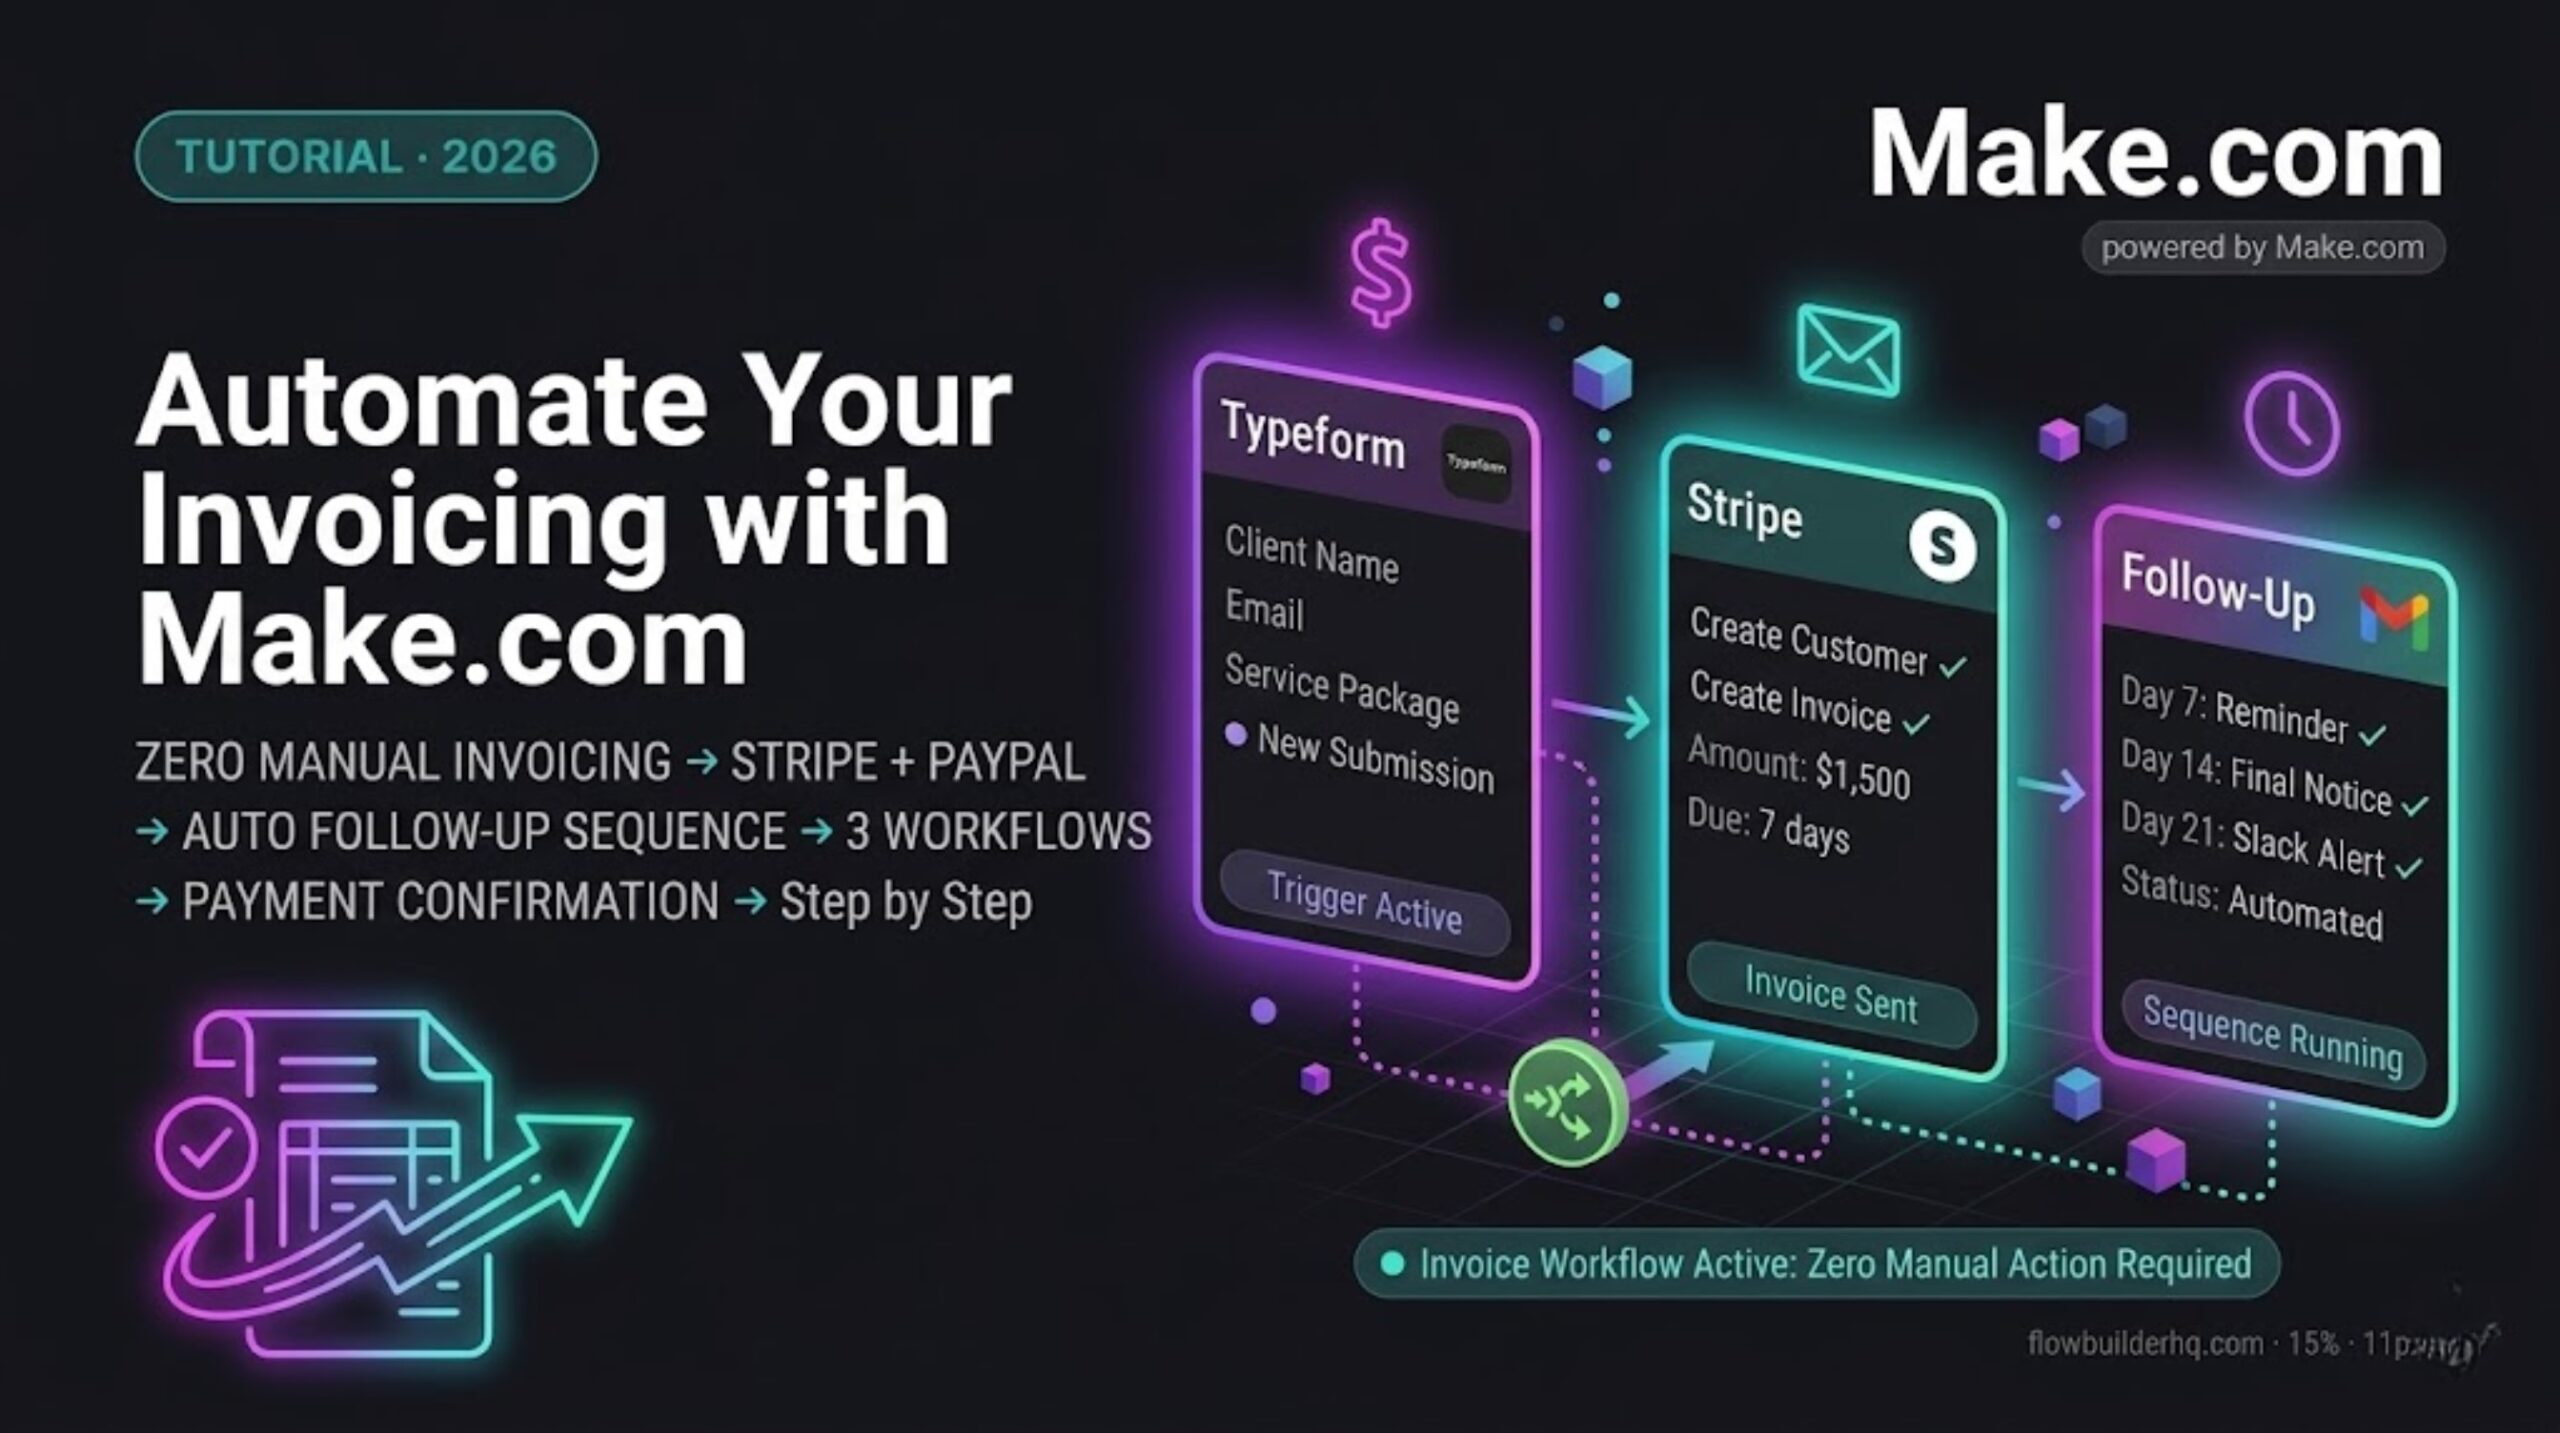
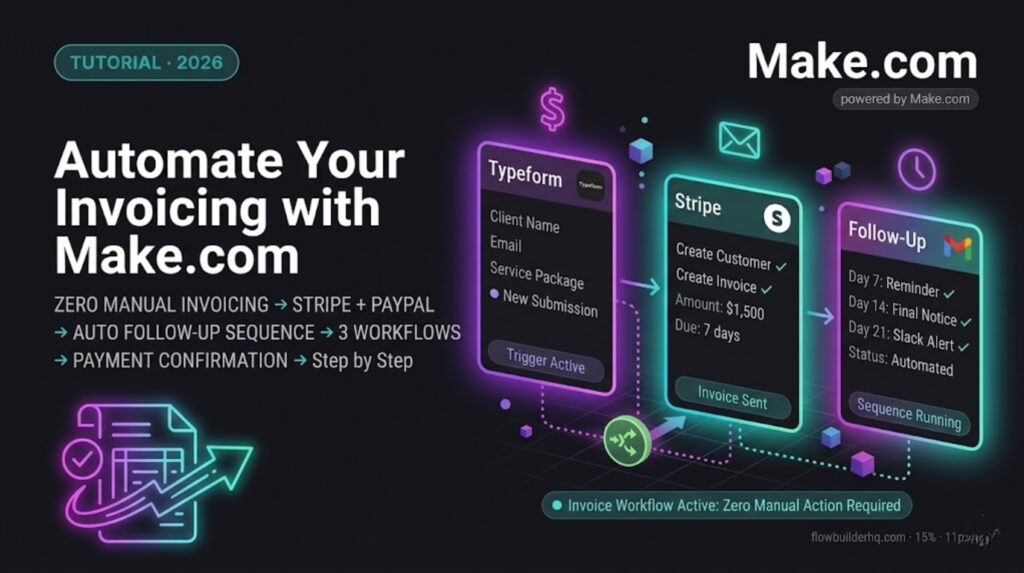
Automate Invoicing with Make.com: By the end of this tutorial you’ll have three connected invoicing workflows in Make.com:
- Invoice creation: New client signed → Make.com creates and sends the invoice automatically via Stripe or PayPal
- Payment confirmation: Payment received → confirmation email sent to client → HubSpot deal marked closed → Notion project status updated
- Follow-up sequence: Invoice unpaid after 7 days → reminder email → unpaid after 14 days → second reminder → unpaid after 21 days → Slack alert to handle personally
Manual invoicing — creating, sending, chasing — takes 2–4 hours per month for most solopreneurs. These three workflows eliminate all of it.
Time to build: 2–3 hours for all three. Build them in order — each one feeds into the next.
Prerequisites
- Make.com account — Core plan at $9/month recommended. Free tier works for testing but scheduling is limited.
- Stripe account —Stripe account — free to create. You’ll need API keys from the Stripe dashboard. If you’re not on Stripe yet, sign up here → Stripe.com — it takes under 10 minutes and no monthly fee.
- HubSpot — free CRM. Used to track deal status alongside invoicing.
- Gmail — for sending confirmation and follow-up emails.
- Notion — for project status tracking (optional but recommended).
- Typeform — your client onboarding form as the workflow trigger.
How the Invoicing Automation Works
- Client completes your onboarding form in Typeform
- Make.com catches the submission and reads the selected service package
- Stripe invoice is created automatically with the correct amount and due date
- Invoice is sent to the client’s email directly from Stripe
- When payment is received, Make.com fires a confirmation sequence
- If payment isn’t received, the follow-up sequence runs on a daily schedule
Every step connects to the next. You never touch the invoice manually — from creation to confirmation to follow-up, it runs without you.
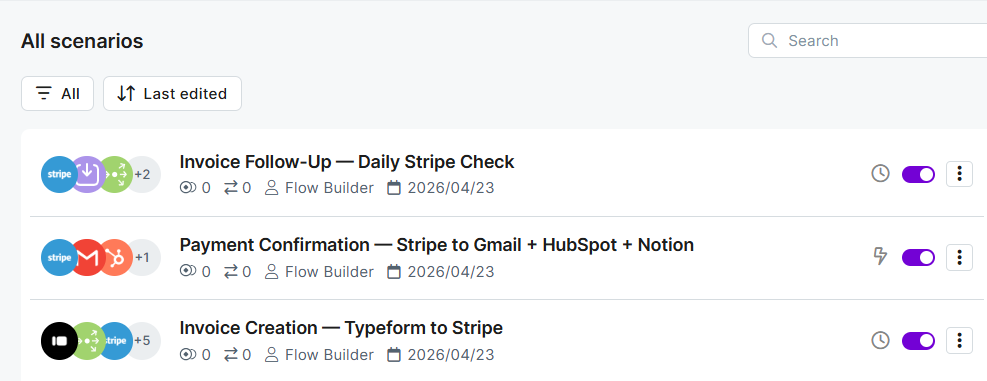
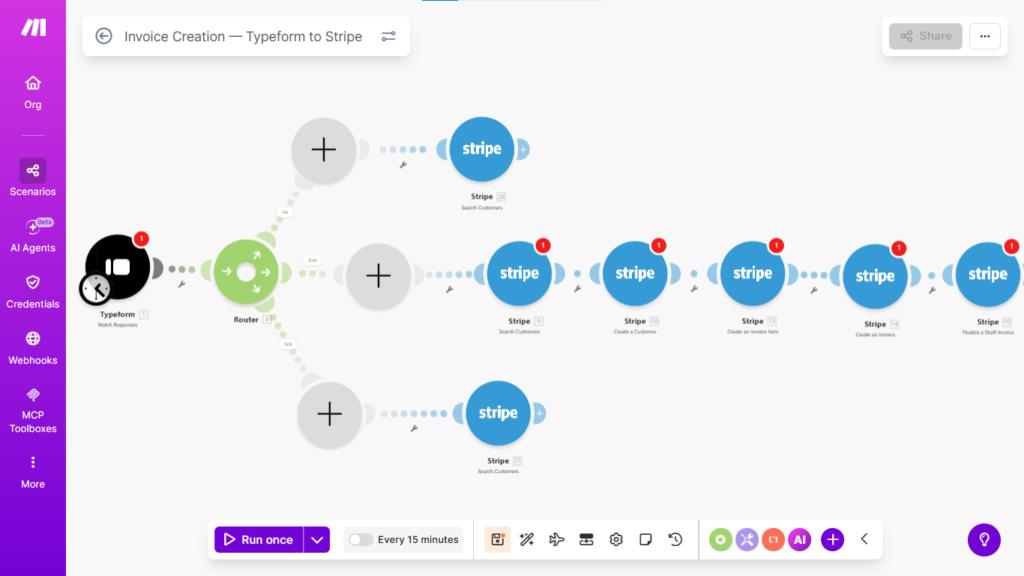
Workflow 1 — Automatic Invoice Creation and Sending (Stripe)
Trigger: Typeform → new client onboarding form submission
Step 1 — Create the Scenario
Open Make.com → New Scenario → name it Invoice Creation — Typeform to Stripe.
Step 2 — Add the Typeform Trigger
- Add node: Typeform Trigger (webhook-based)
- Connect your Typeform credentials
- Select your client onboarding form
- Click Listen for Test Event → submit a test entry
- Note the fields: client name, email, service package, billing email
Step 3 — Add a Router for Multiple Packages
If you offer multiple service packages at different price points, add a Router node immediately after the Typeform trigger:
- Route 1: Package = “Starter” → invoice amount $X
- Route 2: Package = “Pro” → invoice amount $Y
- Route 3: Package = “Retainer” → invoice amount $Z
Each route flows into its own Stripe sequence with the correct amount hardcoded. This prevents any pricing errors from expression mapping.
If you offer one package only: skip the router and map the amount directly.
Step 4 — Find or Create Stripe Customer
- Add node: Stripe → Search Customers
- Search by: client email from Typeform
- This checks if the client already exists in Stripe before creating a duplicate
Add an IF node after the search:
- If customer found → use existing customer ID
- If customer not found → add node: Stripe → Create Customer (name + email from Typeform)
Step 5 — Create the Invoice Item
- Add node: Stripe → Create Invoice Item
- Customer: customer ID from Step 4
- Amount: package price in cents (Stripe uses cents — $1,500 = 150000)
- Currency:
usd(or your currency) - Description:
{{ Service Package }} — {{ Month }} {{ Year }}
Step 6 — Create and Send the Invoice
- Add node: Stripe → Create Invoice
- Customer: same customer ID
- Collection Method: Send Invoice
- Days Until Due: 7 (or your standard payment terms)
- Add node: Stripe → Send Invoice
- This finalizes the invoice and sends it to the client’s email on file in Stripe
Common issue: Amount must be at least $0.50 error in Stripe. This triggers if the amount field is mapped incorrectly and returns 0 or null. Go back to the Router node and verify each route has a hardcoded integer value in cents, not an expression pulling from Typeform.
Common issue: Invoice created but not sent. Stripe requires the invoice to be in “draft” status before sending. The Send Invoice node finalizes and sends it — make sure it’s the last Stripe node in the sequence, not the Create Invoice node.
Workflow 1b — Invoice Creation via PayPal (Alternative)
If you use PayPal instead of Stripe, the setup uses PayPal’s invoicing API via Make.com’s HTTP module — PayPal’s native Make.com module doesn’t cover invoice creation directly.
PayPal Setup
- Go to developer.paypal.com → create an app → copy Client ID and Secret
- In Make.com, add an HTTP Request node
- First call: get an access token
- Method: POST
- URL: https://api.paypal.com/v1/oauth2/token
- Auth: Basic Auth with Client ID and Secret
- Body: grant_type=client_credentials
- Second call: create the invoice
- Method: POST
- URL: https://api.paypal.com/v2/invoicing/invoices
- Header: Authorization: Bearer
{{1.body.access_token}} - Body: JSON with recipient email, item description,
amount, due date
- Third call: send the invoice
- Method: POST
- URL: https://api.paypal.com/v2/invoicing/invoices/
{{2.body.id}}/send - Header: Authorization: Bearer
{{1.body.access_token}}
Honest take on PayPal vs Stripe for automation: Stripe’s native Make.com module makes invoicing automation significantly cleaner — 4 nodes vs 3 HTTP Request calls with manual token handling. If you’re building this workflow from scratch and haven’t committed to a payment processor yet, Stripe is the better choice for automation purposes.
Workflow 2 — Payment Confirmation Sequence
Payment received in Stripe → confirmation email sent to client → HubSpot deal marked closed-won → Notion project page status updated to “Active.”
Trigger: Stripe → Watch Events (webhook) — filter for invoice.paid
Step 1 — Create the Scenario
New Scenario → name it Payment Confirmation — Stripe to Gmail + HubSpot + Notion.
Step 2 — Stripe Webhook Trigger
- Add node: Stripe → Watch Events
- Connect your Stripe credentials
- Event type:
invoice.paid - This fires the moment a client pays — no polling, no delay
Step 3 — Send Confirmation Email
- Add node: Gmail → Send Email
- To: client email from the Stripe event data (
{{ customer_email }}) - Subject:
Payment received — thank you, {{ customer_name }} - Body: Confirm the payment amount, confirm the project start date, outline the next step. Keep it under 100 words.
Write your actual confirmation email here before activating. This email is the first touchpoint after payment — it sets the tone for the working relationship.
Step 4 — Update HubSpot Deal
- Add node: HubSpot → Search Deals — find the deal by client email
- Add node: HubSpot → Update Deal
- Stage: Closed Won
- Close Date: today (
{{ now }}) - Amount: pull from Stripe event data
Step 5 — Update Notion Project Status
- Add node: Notion → Update Page
- Find the client’s project page by email (match against the Email property)
- Update: Status → “Active”, Payment Received → checked, Start Date → today
Common issue: Stripe webhook events arriving with no customer email attached. This happens when the Stripe customer record was created without an email field. Fix: go back to Workflow 1 Step 4 and ensure the email is passed to the Create Customer node. All subsequent payment events will then include it.
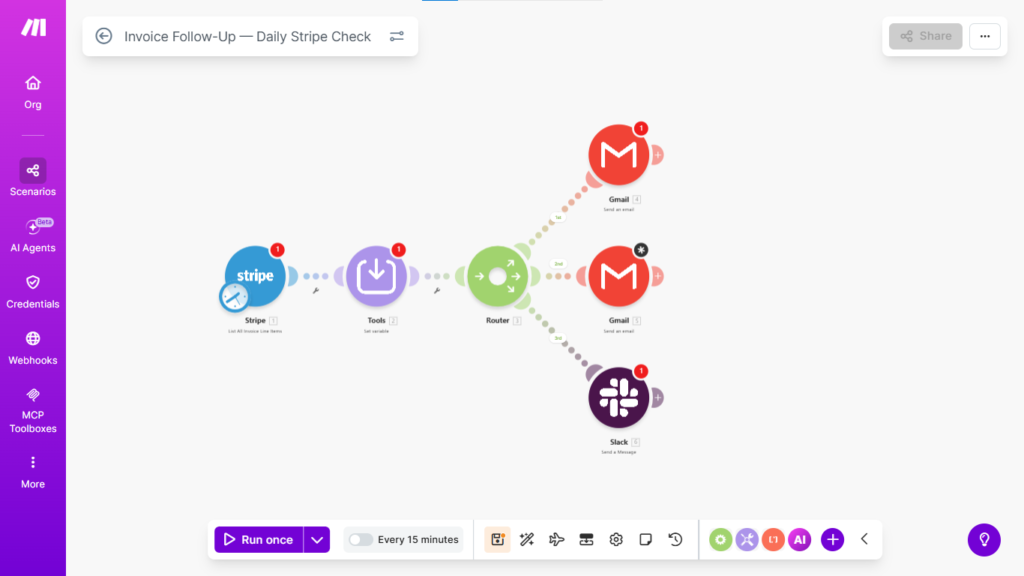
Workflow 3 — Invoice Follow-Up Sequence
Runs every morning, checks all open Stripe invoices, and fires reminder emails based on how many days past due each invoice is.
Trigger: Schedule Trigger — daily at 9am
Step 1 — Create the Scenario
New Scenario → name it Invoice Follow-Up — Daily Stripe Check.
Step 2 — Pull All Open Invoices
- Add node: Stripe → List All Invoice Line Items.
- Status filter:
open - Returns all unpaid invoices with due dates and customer details
Step 3 — Calculate Days Overdue
- Add node: Tools → Set Variable
- Variable:
days_overdue - Value:
{{ dateDiff(now, invoice.due_date, "days") }}
Step 4 — Router by Days Overdue
- Add node: Router
- Route 1:
days_overduebetween 7 and 13 → Day 7 reminder - Route 2:
days_overduebetween 14 and 20 → Day 14 reminder - Route 3:
days_overdue>= 21 → Slack alert
Step 5 — Day 7 Reminder Email
- Add node: Gmail → Send Email
- Subject:
Quick note on your invoice, {{ customer_name }} - Body: Friendly reminder. Include invoice amount, original due date, and a direct Stripe payment link (
{{ invoice.hosted_invoice_url }}).
Step 6 — Day 14 Reminder Email
- Subject:
Invoice #{{ invoice_number }} — payment still outstanding - Body: Direct and professional. Second notice. Include payment link and your contact details for questions.
Step 7 — Day 21 Slack Alert
- Add node: Slack → Send Message
- Message:
Invoice overdue 21+ days — {{ customer_name }} — ${{ amount_due }} — {{ customer_email }}. Handle personally. - At this point the automation stops and you take over directly.
Common issue: Follow-up emails firing multiple times for the same invoice. Fix: add a filter after each reminder email that checks Stripe invoice metadata. After sending the first reminder, use Stripe → Update Invoice Metadata to add reminder_1_sent: true.
Then add an IF node before Step 5 and configure the condition as:
- Field:
{{invoice.metadata.reminder_1_sent}} - Operator: Does not equal
- Value:
true
This tells Make.com to skip the email if the tag already exists on that invoice. After the Day 7 reminder fires, add a Stripe → Update Invoice Metadata node with reminder_1_sent: true — this closes the loop and prevents repeat sends.
Repeat the same pattern for Day 14: metadata key reminder_2_sent, checked before Step 6, set to true after the email sends.
What This Stack Costs to Run
| Tool | Plan | Monthly Cost |
|---|---|---|
| Make.com | Core | $9/month |
| Stripe | Pay-as-you-go | 2.9% + 30¢ per transaction |
| HubSpot | Free CRM | $0 |
| Gmail | Standard | $0 |
| Notion | Free | $0 |
Total fixed cost: $9/month. Stripe’s transaction fee is a cost of doing business regardless of whether you’re automating — it’s not an automation cost. At 10 clients invoiced per month, this system saves approximately 3–4 hours of manual admin.
What to Build Next
Monthly recurring invoice automation: For retainer clients, add a Schedule Trigger set to the 1st of each month → automatically create and send the monthly invoice → no manual action required. The entire retainer billing cycle runs without touching it.
Make.com Core at $9/month runs all three of these workflows
→ Try Make.com
Invoicing is one of the highest-ROI automations a freelancer can build, but it’s just the start. The content repurposing workflow handles your marketing output, and the client onboarding automation handles new client intake. For a side-by-side cost comparison of running this on Make.com versus alternatives, see Make.com vs Zapier for solopreneurs.