Make.com for Freelancers: Automate Your Client Workflow as a Consultant or Coach

What You’ll Have Running After This
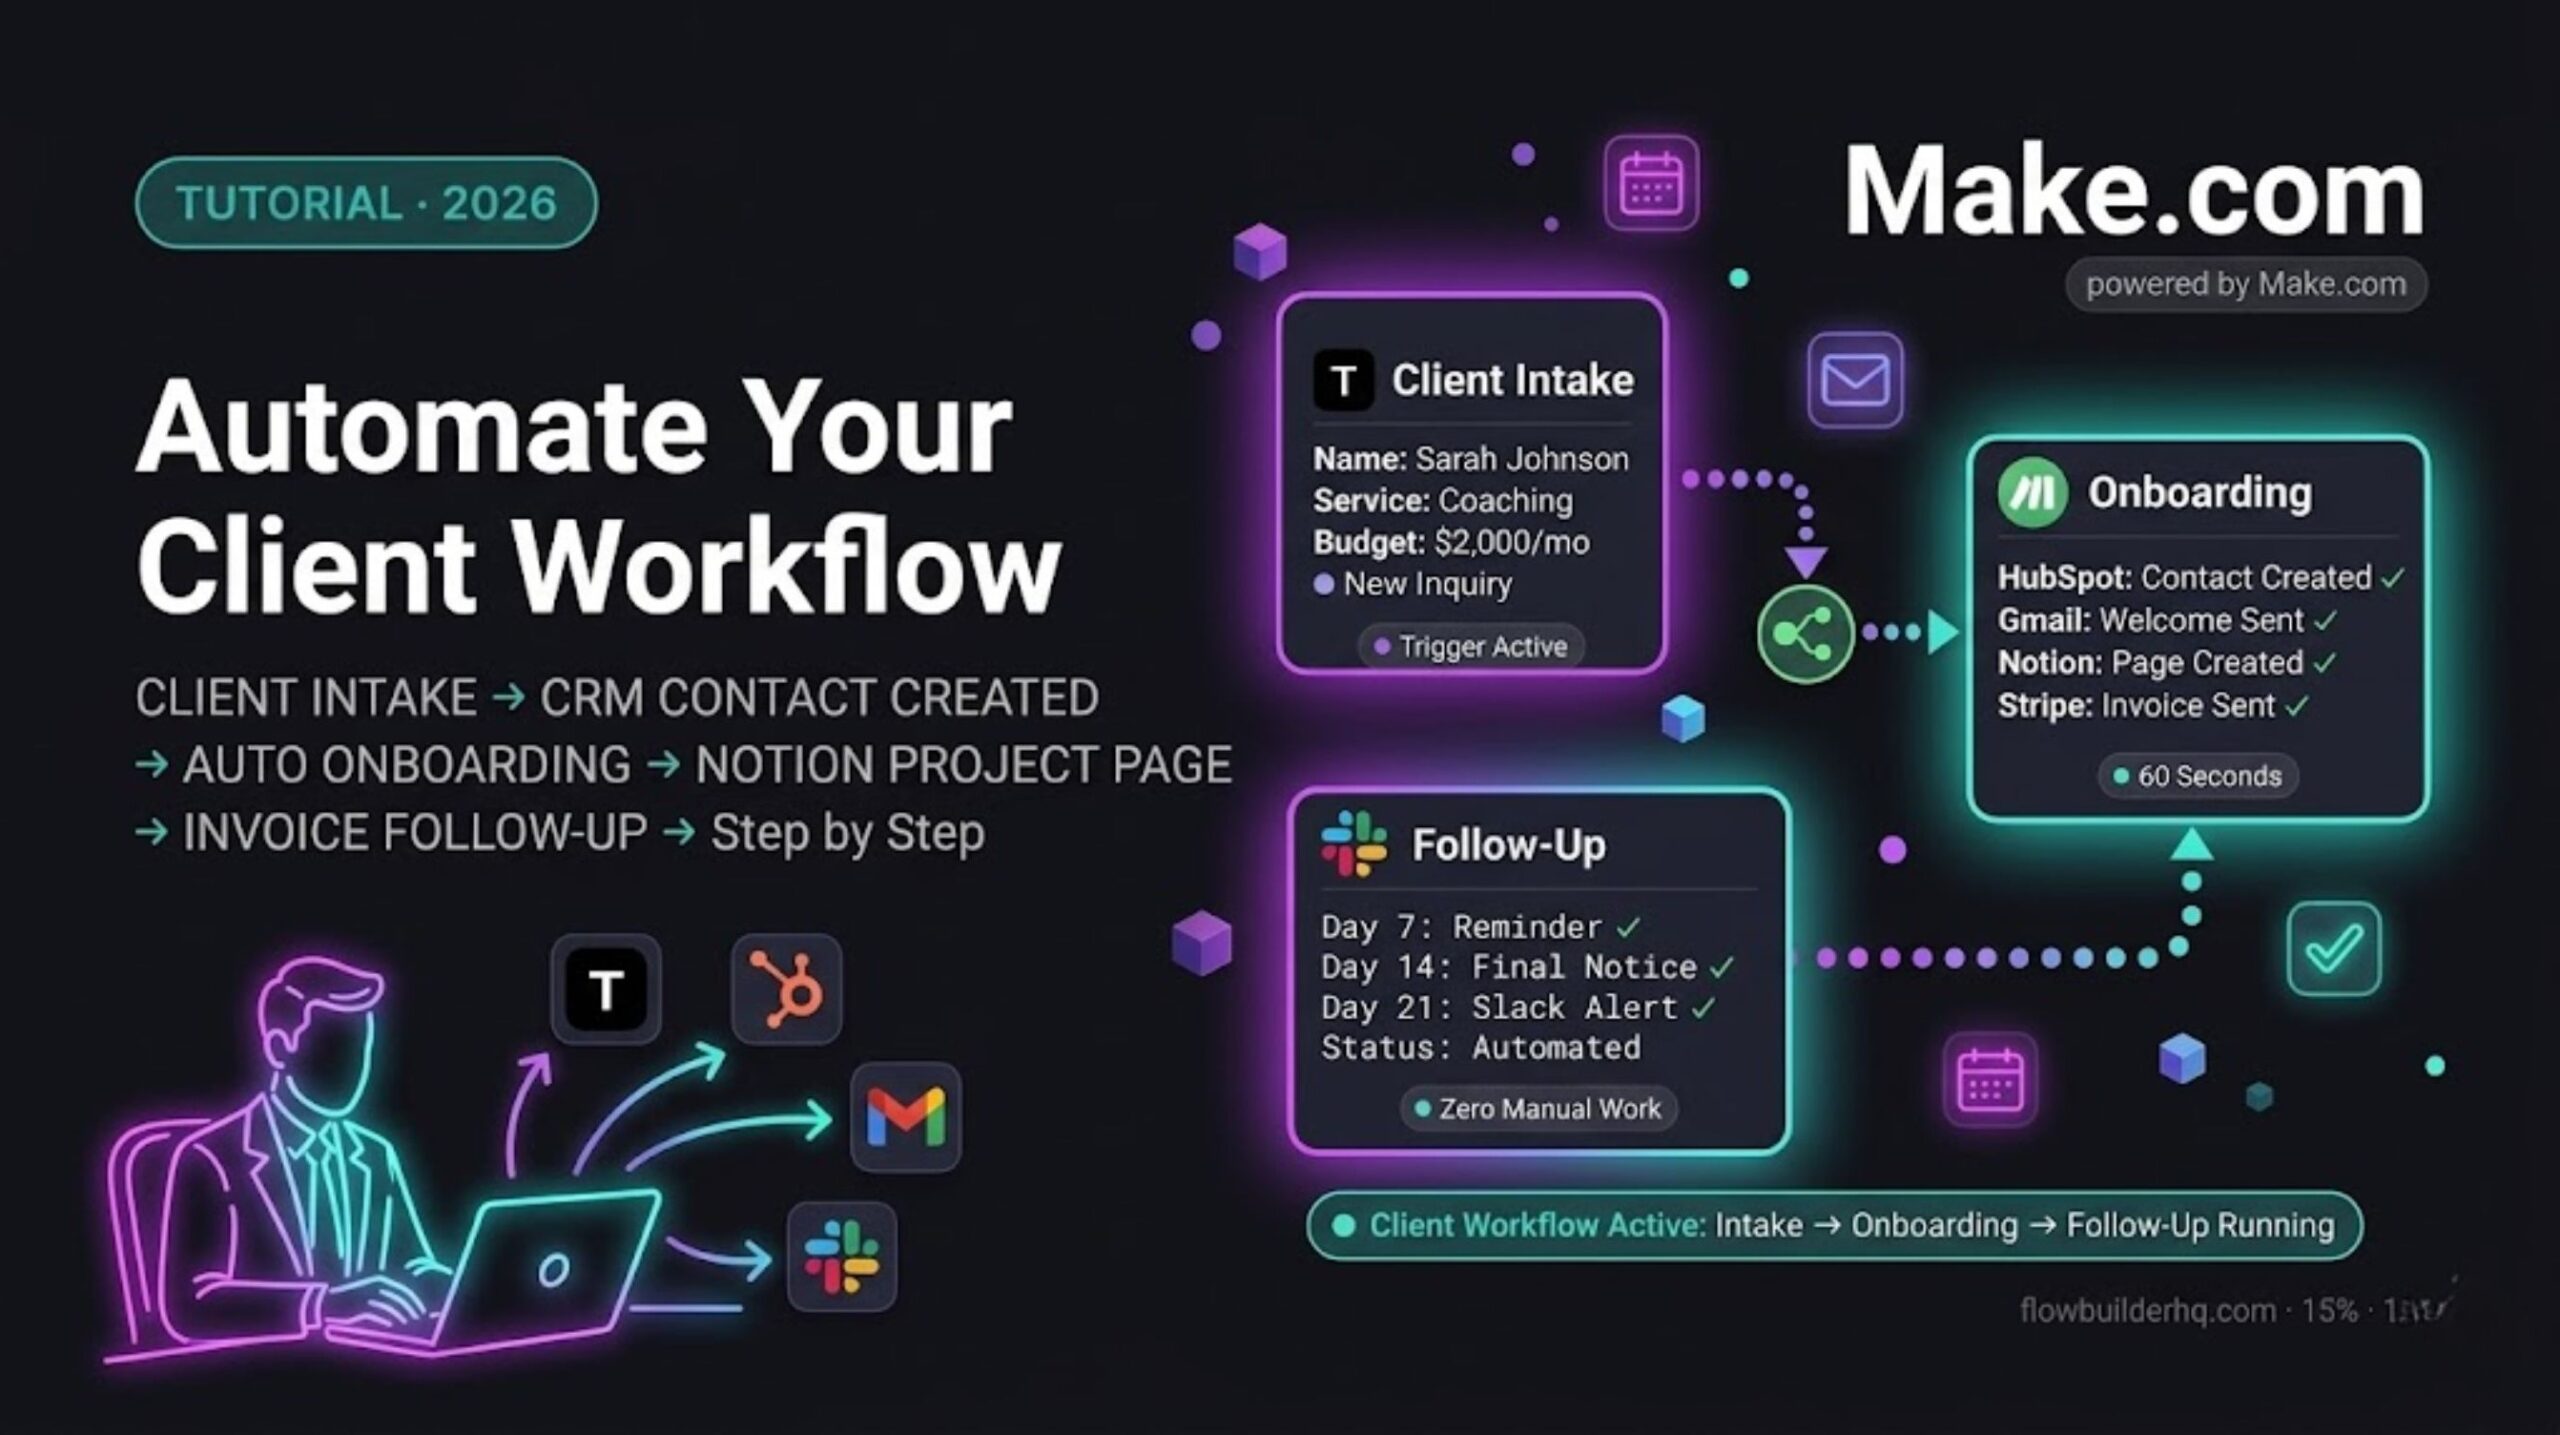
By the end of this post Make.com for Freelancers you’ll have three automated workflows covering the full client lifecycle:
- Intake: New inquiry → CRM contact created → confirmation email sent → discovery call booked
- Onboarding: Signed client → welcome email → Notion project page created → invoice triggered
- Invoice follow-up: Payment due → automated reminder sequence → Slack alert if still unpaid
These three workflows cover the repetitive admin that eats 3–5 hours per week for most consultants and coaches. Once they’re live, that time goes back to billable work.
Time to build all three: 3–4 hours. Each workflow is independent — build them one at a time and stop when you need to.
Why Make.com Fits the Consultant and Coach Workflow
Most automation tools are built for e-commerce or SaaS. Make.com works exceptionally well for service businesses because it handles the messy, human-driven workflows that consultants actually run — conditional logic based on service type, personalized emails that don’t sound templated, and multi-step sequences that mirror how client relationships actually progress.
The visual canvas also matters when you’re running a solo practice. You need to see what’s happening in your automation without hiring a developer to maintain it. Make.com’s error panel shows you exactly what broke and lets you fix it without touching code.
What you’ll need before building:
- Make.com account (free tier works to start, Core at $9/month for full scheduling)
- Typeform (free) — for intake and onboarding forms
- HubSpot (free CRM) — for contact and deal management
- Gmail — for client communications
- Notion — for project tracking
- Stripe — for invoicing (optional — swap for your invoicing tool)
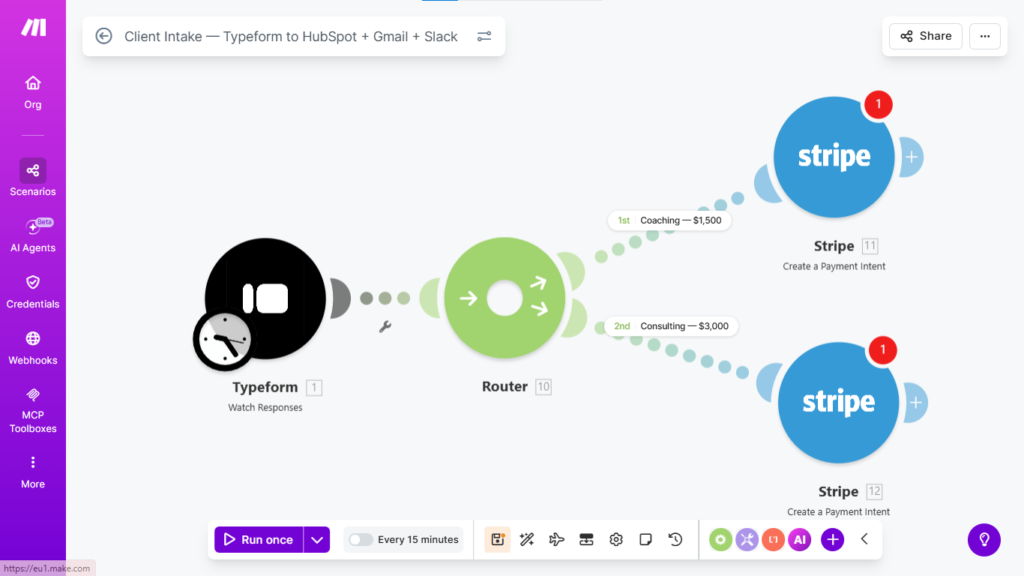
Workflow 1 — Client Intake Automation
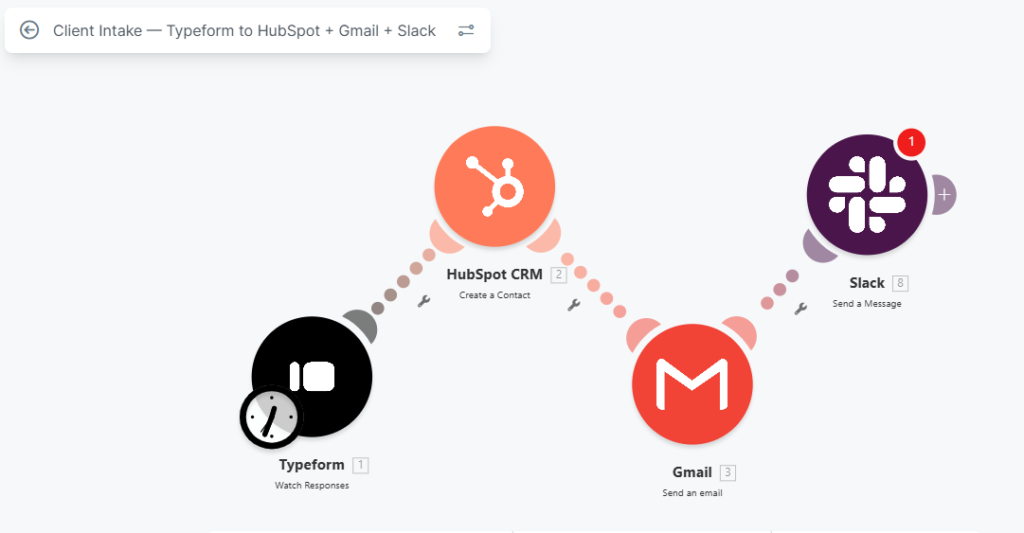
A prospect fills out your inquiry form → Make.com creates their contact in HubSpot → sends them a confirmation email → notifies you in Slack so you can follow up fast.
Most consultants lose leads because follow-up takes too long. This workflow responds to every inquiry within 60 seconds, automatically, while you’re on a call or with another client.
Step 1 — Create the Scenario
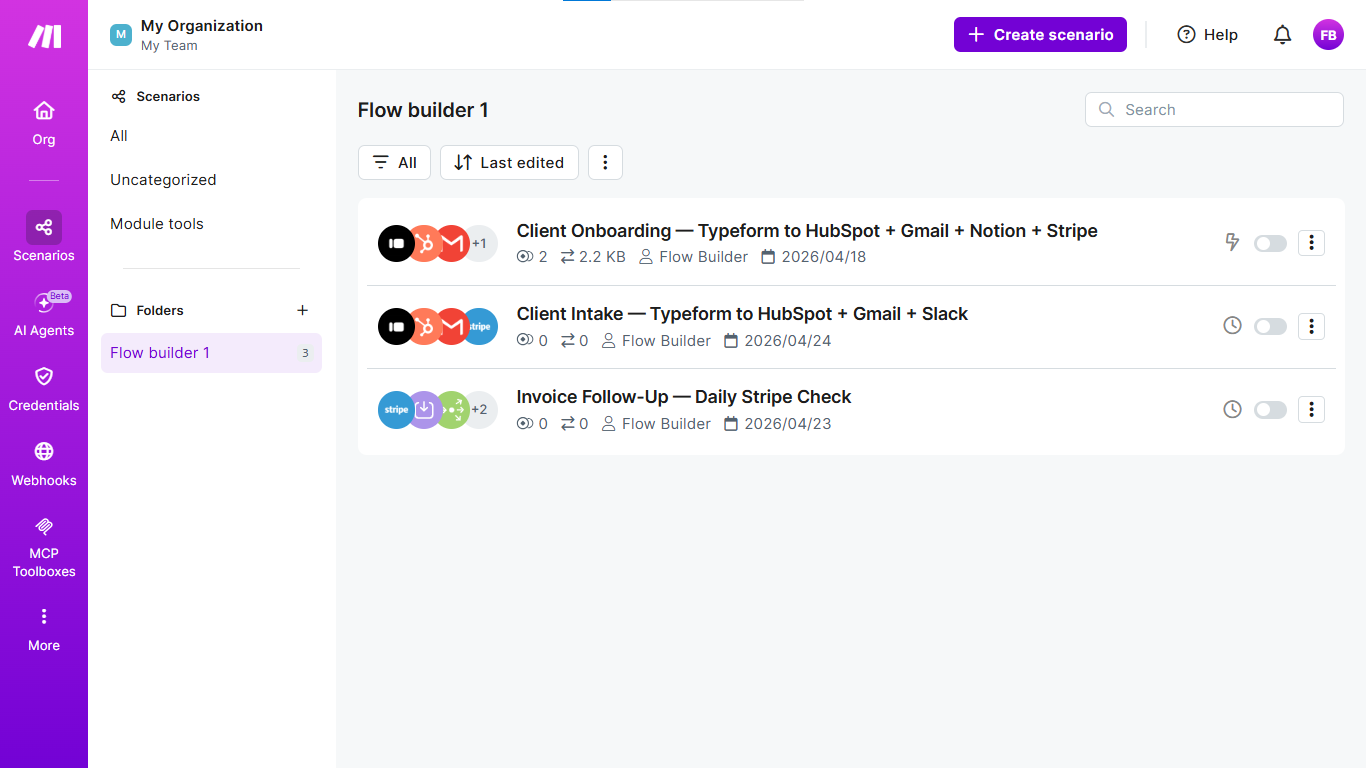
Open Make.com → New Scenario → name it Client Intake — Typeform to HubSpot + Gmail + Slack.
Step 2 — Add the Typeform Trigger
- Add node: Typeform Trigger (webhook-based, fires instantly)
- Connect your Typeform credentials
- Select your inquiry form
- Click Listen for Test Event → submit a test inquiry through your form
- Verify the data structure — note which fields map to name, email, service interest, and budget
Step 3 — Create the HubSpot Contact
⚠️ HubSpot connection: use a Private App token with crm.objects.contacts.write scope. The HubSpot OAuth2 trigger has known credential issues in Make.com — the Private App method is more reliable.
- Add node: HubSpot → Create or Update Contact
- Map: Email, First Name, Last Name from Typeform fields
- Add a custom property for “Service Interest” if your form captures it — this feeds segmentation later
- Run against test data — confirm a contact appears in HubSpot
Step 4 — Send the Confirmation Email
- Add node: Gmail → Send Email
- To: prospect’s email from Typeform
- Subject:
Thanks for reaching out, {{ First Name }} — here's what happens next - Body: Confirm you received their inquiry, set expectations for your response time, and include a Calendly link for discovery calls if you use one.
Insert your actual confirmation email copy here before publishing. The tone should match how you write to clients — not a generic autoresponder.
Step 5 — Slack Notification
- Add node: Slack → Send Message
- Channel: your private alerts channel or direct message to yourself
- Message:
New inquiry from {{ First Name }} {{ Last Name }} — {{ Service Interest }} — {{ Email }} - This fires within seconds of form submission — you know about every lead the moment it comes in
Common issue: Typeform webhook not firing on first test. Go to Typeform → Connect → Webhooks and verify the Make.com webhook URL is listed and active. Copy it manually from the Make.com node if it’s missing.
Workflow 2 — Client Onboarding Automation
A new client completes your onboarding form → HubSpot contact updated to “Active Client” status → personalized welcome email sent → Notion project page created with their details pre-filled → invoice triggered in Stripe.
Manual onboarding for a new client typically takes 45–90 minutes of admin — updating your CRM, setting up a project folder, sending the welcome email, creating the invoice. This workflow does all of it in under 60 seconds.
Step 1 — Create the Scenario
New Scenario → name it Client Onboarding — Typeform to HubSpot + Gmail + Notion + Stripe.
Step 2 — Typeform Trigger
- Use a separate onboarding form — different from your intake form
- Fields to capture: full name, email, company, service package selected, start date, billing email if different
- Connect as before — listen for test event, submit test data
Step 3 — Update HubSpot Contact
First add node: HubSpot → Search Contacts — search by email from Typeform. Then feed the returned Contact ID into the Update Contact node.
- Add node: HubSpot → Update Contact
- Find the contact by email (use the email from the Typeform submission)
- Update: Lifecycle Stage → Customer, Deal Stage → Active
- Add their service package and start date as custom properties
Step 4 — Send Welcome Email
- Add node: Gmail → Send Email
- Subject:
Welcome aboard, {{ First Name }} — your project starts {{ Start Date }} - Body: Three sections — what happens in the first week, what you need from them, how to reach you. Personalize with their name, company, and package name pulled from the form.
This email sets the tone for the entire client relationship. Write it in your actual voice before activating this workflow.
Step 5 — Create Notion Project Page
- Add node: Notion → Create a Page
- Database: your client projects database
- Title:
{{ First Name }} {{ Last Name }} — {{ Service Package }} - Properties to map: Client Name, Email, Company, Package, Start Date, Status (set to “Active”), Monthly Value
Common issue: Could not find database error in Notion. Fix: open your Notion client database → three dots → Connections → Add connection → select your Make.com integration. Re-run the node.
Step 6 — Trigger the Invoice in Stripe
- Add node: Stripe → Create Invoice Item, then Stripe → Create Invoice
- Customer: look up by email or create new
- Amount: pull from the package selected on the onboarding form
- Due date: set to 7 days from today using {{addDays(now; 7)}}
Router node for multiple packages: If you offer multiple service tiers, add a Router node after the Typeform trigger. Set conditions: if Package = “Coaching” → route to path A with your coaching invoice amount. If Package = “Consulting” → route to path B with your consulting amount. Each path feeds into the same HubSpot, Gmail, and Notion nodes downstream.
Workflow 3 — Invoice Follow-Up Automation
Invoice created in Stripe → Make.com monitors payment status → if unpaid after 7 days, sends a polite reminder email → if still unpaid after 14 days, sends a firmer follow-up → if unpaid at 21 days, sends you a Slack alert to handle personally.
Chasing invoices is the worst part of running a consulting or coaching practice. This workflow handles the first two follow-ups automatically, in your voice, without you thinking about it. You only get involved when a payment is genuinely stalled.
Step 1 — Create the Scenario
New Scenario → name it Invoice Follow-Up — Stripe Payment Monitoring.
Step 2 — Schedule Trigger
- Add node: Schedule Trigger
- Set to run once daily at 9am
- This workflow checks all open invoices every morning rather than reacting to events
Step 3 — Pull Open Invoices from Stripe
- Add node: Stripe → List All Invoice Line Items
- Filter: Status = Open (unpaid)
- Returns all currently unpaid invoices with their due dates and client details
Step 4 — Filter by Days Overdue
Add node: Router
- Route 1:
days_overdue>= 7 AND < 14 → Day 7 reminder - Route 2:
days_overdue>= 14 AND < 21 → Day 14 reminder - Route 3:
days_overdue>= 21 → Slack alert
Also add a Set Variable step before the Router to calculate days overdue: - Add node: Tools → Set Variable
- Variable:
days_overdue - Value:
{{dateDiff(now; invoice.due_date; "days")}}
Step 5 — First Reminder Email (Day 7)
- Add node: Gmail → Send Email
- Subject:
Quick note on your invoice, {{ Client First Name }} - Tone: friendly, assumes it slipped through. Include invoice amount, due date, and a direct payment link from Stripe.
⚠️ After the Day 7 reminder sends, add a Stripe → Update Invoice Metadata node withreminder_1_sent: true. Before Step 5, add a Filter checking{{invoice.metadata.reminder_1_sent}}does not equaltrue. Repeat for Day 14 withreminder_2_sent. Without this, the reminder fires every day for the same invoice.
Step 6 — Second Reminder Email (Day 14)
- Add node: Gmail → Send Email
- Subject:
Invoice #{{ Invoice Number }} — payment still outstanding - Tone: direct and professional. Reference that this is a second notice. Include payment link and your preferred contact method if they have questions.
Step 7 — Slack Alert (Day 21+)
- Add node: Slack → Send Message
- Message:
Invoice overdue 21+ days — {{ Client Name }} — ${{ Amount }} — {{ Client Email }}. Handle personally. - At this point the automation hands off to you for a direct conversation.
Common issue: The daily schedule trigger runs but returns no invoices. Confirm your Stripe connection in Make.com has read access to invoices. Go to Make.com → Connections → Stripe → verify the API key has invoices:read scope.
What to Build Next
Offboarding automation: Project marked complete in Notion → testimonial request email sent automatically → HubSpot contact moved to “Past Client” stage → 90-day check-in scheduled. Takes one scenario and keeps past clients warm without manual effort.
Monthly reporting: First of each month → Make.com pulls active client count from HubSpot, revenue from Stripe, and project status from Notion → formats a personal dashboard email sent to you every morning. No spreadsheet-checking required.
Make.com handles all three of these workflows on the Core plan at $9/month — start a free trial and build your intake workflow today.
→ Try Make.com
If freelance invoicing is your priority use case, the Make.com invoicing automation tutorial walks through the exact Stripe-to-Make.com setup. For client-facing workflows beyond invoicing, the content repurposing automation guide shows how to turn one blog post into LinkedIn, email, and tweet outputs automatically. And for the full toolstack picture, see the best automation tools for solopreneurs in 2026.