How to Connect Make.com to HubSpot (Step-by-Step Integration Tutorial)
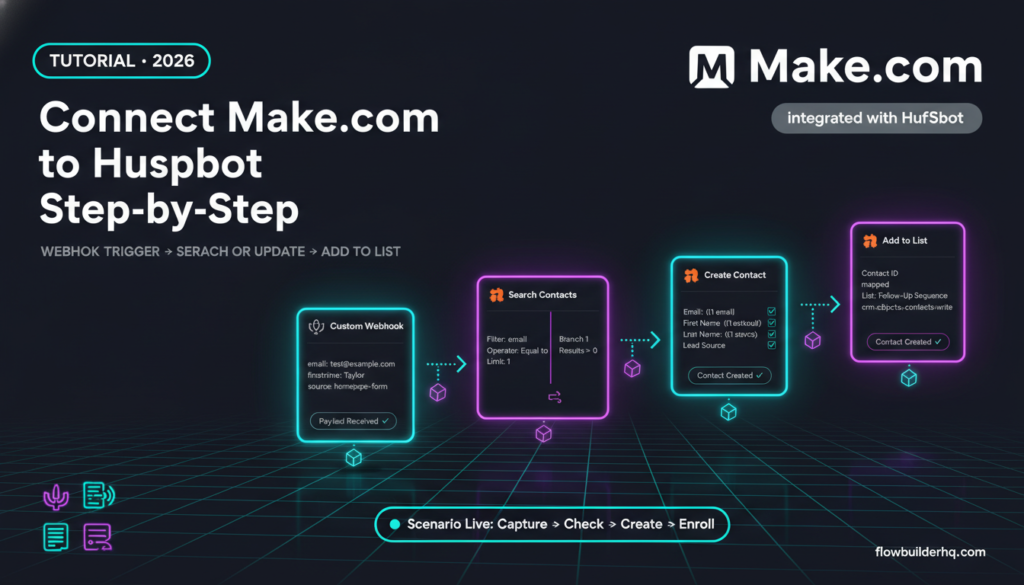
If you want to know how to connect Make.com to HubSpot without duct-taping two separate tools together manually, this tutorial walks through a complete, working scenario — from authenticating both platforms to building a real automation that creates and updates contacts in HubSpot based on external triggers.
The scenario covered here: a new lead submits a form on your website (via a webhook), Make.com catches it, checks if the contact already exists in HubSpot, creates or updates the record, and then adds them to a follow-up sequence. This covers the four HubSpot module types you’ll use in almost every CRM automation.
Before starting, you need an active Make.com account and a HubSpot account. HubSpot’s free CRM tier works for this — you don’t need a paid plan to use the API. If you’re still comparing options, the HubSpot Free vs Paid breakdown is worth reading first.
What You’ll Need
- A Make.com account (free plan covers this tutorial — 1,000 ops/month)
- A HubSpot account (free CRM works)
- A HubSpot Private App token (replaces the old API key)
- Basic familiarity with Make.com scenarios and modules
Make.com uses HubSpot’s v3 API under the hood. The native HubSpot module in Make.com handles OAuth2 or Private App authentication — Private App tokens are the recommended approach now since HubSpot deprecated legacy API keys in 2023.
Step 1: Create a HubSpot Private App Token
Log into HubSpot. Go to Settings → Account Setup → Integrations → Private Apps. Click Create a private app.
Name it something identifiable — “Make.com Integration” works. Under the Scopes tab, you need at minimum:
crm.objects.contacts.readcrm.objects.contacts.writecrm.schemas.contacts.read
If your scenario will touch deals or companies, add those scopes too. Narrow scopes are better — don’t select everything. Click Create app and copy the token immediately. HubSpot only shows it once.
Store that token somewhere safe. You’ll paste it into Make.com in the next step.
Step 2: Connect HubSpot to Make.com
Open Make.com and create a new scenario. Add your first module — search for “HubSpot CRM” in the module library. For this tutorial, start with Watch Contacts or a trigger of your choice, but in the scenario described here, the trigger is a Custom Webhook (because we’re catching form submissions).
Add any HubSpot CRM module to the canvas. When prompted for a connection, click Add. You’ll see two options: OAuth2 or API Key (token). Select API Key and paste your Private App token.
Make.com will validate the connection. If it fails, the most common reason is missing scopes — go back to your HubSpot Private App, add the required scopes, and re-save. The connection attempt in Make.com will then succeed.
Once connected, that connection is saved and reusable across every HubSpot module in every scenario. You won’t re-authenticate per module.
If you’re new to Make.com’s interface and want more context on how it handles connections, the Make.com review covers the overall platform in detail.
Step 3: Set Up the Webhook Trigger
Remove any placeholder module and add a Webhooks → Custom Webhook as the first module. Click Add to create a new webhook, name it “Lead Form Submission,” and copy the generated URL.
Send a test payload to that URL — either from your actual form tool or manually via a tool like a browser-based POST tool or your form platform’s test function. A minimal test payload looks like:
{
  "email": "test@example.com",
  "firstname": "Taylor",
  "lastname": "Reeves",
  "phone": "+1-555-0100",
  "source": "homepage-form"
}
After Make.com receives the test payload, click OK. The webhook module now shows the data structure. Every field in your JSON becomes a mappable variable in downstream modules. This is the data that flows through to HubSpot.
For a deeper walkthrough of webhook mechanics in Make.com, the Make.com webhooks tutorial covers the pattern in full.
Step 4: Search for an Existing Contact in HubSpot
Before creating a contact, check if one already exists with that email. Duplicating records in HubSpot is messy to clean up.
Add a new module: HubSpot CRM → Search for Contacts. Map the connection you created. Under Filter, set:
- Property:
email - Operator: Equal to
- Value: map the
emailfield from the webhook payload
Set Limit to 1. This returns the first matching contact or nothing if no match exists.
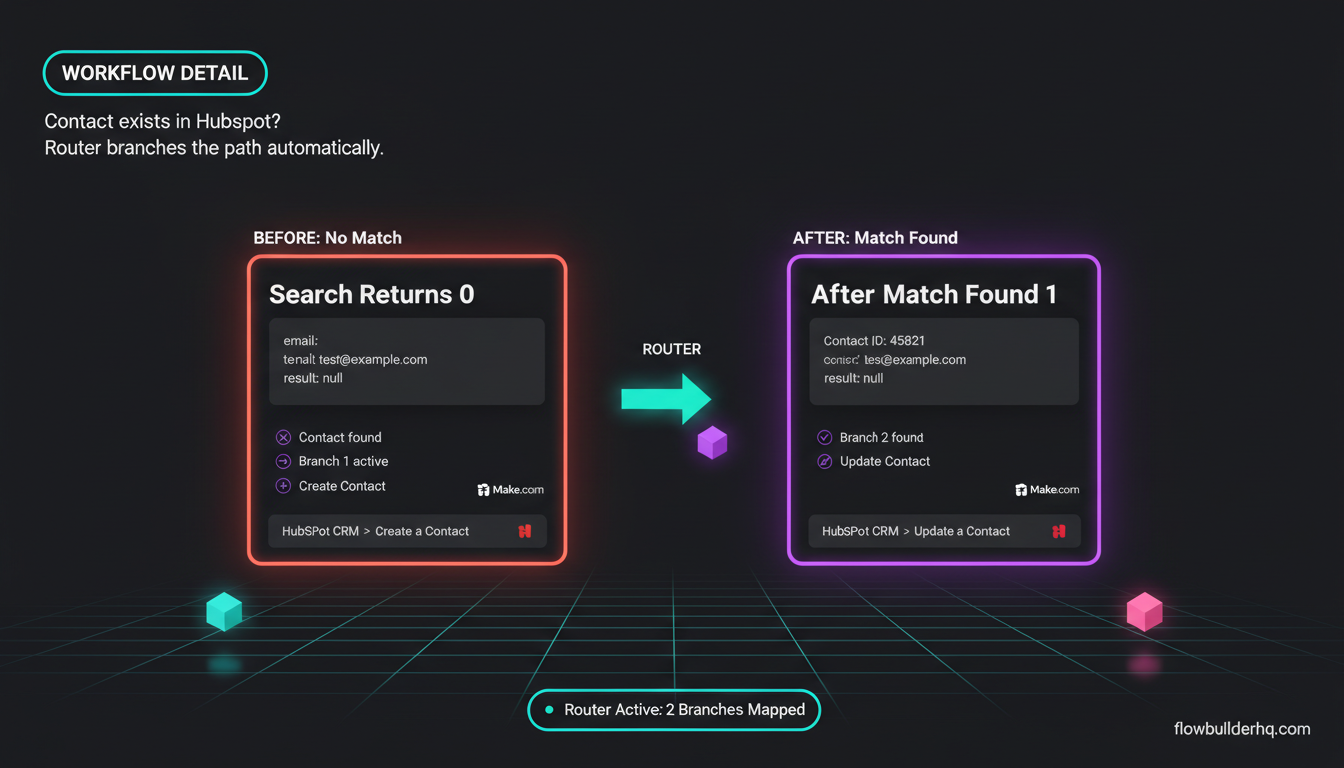
Now add a Router module after the search. A Router splits the scenario into two branches: one for “contact found” and one for “contact not found.” This is where the create-vs-update logic lives.
Step 5: Branch 1 — Create a New Contact
On the first Router path, add a filter: Number of results equals 0 (using the bundle count from the Search module). This path only runs when no existing contact was found.
Add module: HubSpot CRM → Create a Contact. Map fields from the webhook payload:
- Email:
{{1.email}} - First Name:
{{1.firstname}} - Last Name:
{{1.lastname}} - Phone:
{{1.phone}} - Lead Source:
{{1.source}}
The field names in Make.com’s HubSpot module match HubSpot’s internal property names. Standard properties appear in the dropdown. Custom properties you’ve created in HubSpot also appear here — Make.com pulls them dynamically from your account schema.
If a custom property doesn’t appear, go back to HubSpot and confirm the property is associated with Contacts (not Companies or Deals). Then back in Make.com, click the refresh icon next to the field selector to re-fetch the schema.
Step 6: Branch 2 — Update an Existing Contact
On the second Router path, add a filter: Number of results greater than 0. This path runs when the search returned a match.
Add module: HubSpot CRM → Update a Contact. For the Contact ID field, map the ID returned by the Search module — it’s in the first bundle result. Update whatever fields are relevant. A common pattern is updating the source field so you track which campaign the contact came from most recently, even if they already exist.
This create-or-update pattern is the foundation of almost every CRM automation. It works the same way whether you’re building for a coaching business or a product company — the logic doesn’t change. The Make.com for coaches and consultants guide shows a similar pattern applied to client onboarding workflows.
Step 7: Add the Contact to a Follow-Up Sequence
After both Router branches, you can re-merge the paths or handle sequence enrollment separately per branch. The most useful next step: enroll the contact in a HubSpot sequence or add them to a list.
Add module: HubSpot CRM → Add Contact to a List. Map the Contact ID — use the output from the Create module on Branch 1, and the matched contact ID on Branch 2.
Select the Static List you want in HubSpot. Note: HubSpot sequences (the sales email sequences) require a Sales Hub seat and aren’t accessible via API on the free CRM. Static and dynamic lists are available on free. If you’re on HubSpot Starter ($15/mo), sequences become available via the Enroll in Sequence API action.
This is where the difference between HubSpot’s free and paid tiers shows up in practice — not just in the UI, but in what the API actually lets you do.
Step 8: Handle Errors Properly
Two common failure points in this scenario:
Error: Contact already exists (409 Conflict) — This happens on the Create module if your search filter missed a duplicate or if the email format differs (e.g., uppercase vs lowercase). Fix: add an error handler to the Create module. Right-click the module → Add error handler → Resume. On the Resume path, use an Update Contact module as fallback. HubSpot’s API returns the existing contact’s ID in the 409 error body — Make.com exposes this in the error output, so you can map it to the Update module.
Error: Invalid scopes (403 Forbidden) — Almost always means the Private App token is missing a required scope. The error message from HubSpot usually specifies which scope. Go back to your Private App in HubSpot, add the scope, save, and re-test. You don’t need to re-authenticate in Make.com — the token stays the same.
Getting error handling right is what separates a scenario that runs for a week from one that runs for a year. The client reporting automation tutorial covers error handling patterns in Make.com that apply here too.
Step 9: Test the Full Scenario
With all modules connected, click Run once in Make.com. Send a test payload to the webhook URL. Watch the execution bubble-by-bubble in real time.
Check each module output:
- Webhook: received payload ✓
- Search: returned 0 or 1 results ✓
- Router: routed to the correct branch ✓
- Create or Update: HubSpot contact ID returned ✓
- Add to List: list membership confirmed ✓
Then go into HubSpot and verify the contact appears with all fields populated correctly. Check the contact’s activity timeline — you’ll see the creation or update event logged there.
Run the same test payload a second time to verify the update path works correctly. The contact should already exist, so Make.com should route to Branch 2 and update rather than create.
Activate and Schedule
Once testing passes, turn the scenario on. Because this uses a webhook trigger, the scenario runs on-demand whenever the webhook receives a payload — not on a schedule. Make.com processes it as close to real-time as your plan allows.
On the free plan, webhook-triggered scenarios run within a few minutes. On Core ($9/mo) and above, they run within seconds. If real-time lead capture matters for your business, the Core plan is the right call. The Make.com pricing breakdown explains what each tier actually gets you in practice.
You can also add this HubSpot integration inside a more complex multi-step scenario. For example, if you’re already automating lead generation from another source, you can bolt on this HubSpot module chain to the end of that workflow. The lead capture-to-CRM workflow tutorial shows how similar logic works in n8n if you ever want to compare approaches.
How to Connect Make.com to HubSpot: Variations Worth Building Next
Once this base scenario is working, the next logical automations are:
- Deal creation on purchase: Trigger from Stripe webhook → Create Deal in HubSpot → Associate with Contact
- Lead scoring sync: Watch for HubSpot property changes (lead score threshold) → trigger Make.com scenario → send Slack alert or email
- Contact sync from another CRM: If you’re migrating data or running parallel systems, Make.com can pull from one source and push to HubSpot in batches
- Automatic note creation: After a call logged in a scheduling tool, create a HubSpot Note on the contact’s record via Make.com
All of these use the same authentication connection and the same module patterns covered in this tutorial. The HubSpot module library in Make.com also covers Deals, Companies, Tickets, Engagements (notes, emails, calls), and Associations — so you can build fairly complex CRM workflows without touching the API directly.
For context on where HubSpot fits in the broader CRM landscape for solo operators, the best CRM for solopreneurs roundup is a useful reference — especially if you’re still deciding whether HubSpot is the right long-term choice.
And if you want to see how HubSpot compares directly against a simpler tool for contact management, the HubSpot vs Notion comparison gives an honest picture of when HubSpot is overkill and when it’s exactly right.
Ready to Build This?
Make.com’s free plan is enough to run this scenario if your form submissions are under 1,000/month. If you’re processing more than that or need real-time webhook response times, the Core plan at $9/mo covers most solo operator volumes without issue.
You can check Make.com’s official HubSpot integration page to see the full list of available modules and triggers — it’s updated as new HubSpot API endpoints are added.
HubSpot’s developer documentation is also worth bookmarking. When a Make.com module doesn’t expose a specific HubSpot feature, you can use Make.com’s HTTP module to hit the HubSpot API directly — the docs show exactly what endpoints and payloads are available.
Start with a free account on both platforms, run through this tutorial once, and you’ll have a working CRM integration inside an hour. Get started with Make.com free here — no credit card required.
For a broader look at how Make.com handles other business automations beyond CRM, the Make.com ecommerce automation playbook shows the platform doing heavier lifting across order management, inventory, and customer communication workflows.
Building this yourself? Get the workflow pack.
5 ready-to-import n8n workflows — lead capture, invoicing, content repurposing, onboarding, social posting. Free.