How to Automate Content Repurposing with Make.com (Real Workflow, Step by Step)
One Make.com scenario. One blog post input. Three outputs: a LinkedIn snippet, an email newsletter summary, and a tweet thread — all generated and staged for publishing without you touching a keyboard after the trigger fires.
One Make.com scenario. One blog post input. Three outputs: a LinkedIn snippet, an email newsletter summary, and a tweet thread — all generated and staged for publishing without you touching a keyboard after the trigger fires. This is how to automate content repurposing with Make.com using a real production workflow.
That’s what this tutorial builds. If you’ve been manually reformatting content for every channel, this workflow will cut that to zero. You’ll need a Make.com account, a Copy.ai API key, and about 45 minutes to wire it up the first time.
Why Content Repurposing Is the Right Automation Target
Most solopreneurs write one piece of content and publish it once. That’s leaving 80% of the value on the table. The blocker isn’t creativity — it’s the friction of reformatting. LinkedIn wants short punchy hooks. Email wants context and a CTA. Twitter wants a thread structure with numbered posts.
The trigger-transform-publish pattern is exactly right for this. You trigger on a new blog post, transform the content into channel-specific formats, then push each output to its destination. Make.com handles the routing. Copy.ai handles the rewriting. You handle nothing.
This isn’t about replacing your voice — it’s about removing the mechanical work of adapting what you already wrote.
What You’re Building
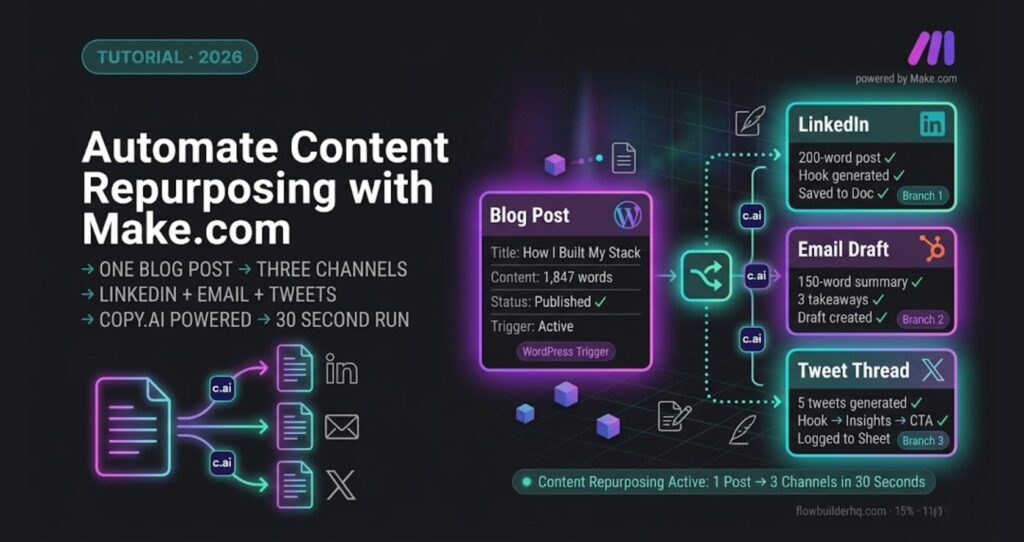
Here’s the full scenario flow before you touch Make.com:
- Trigger: New post published in WordPress (or a row added to Google Sheets if you draft elsewhere)
- Step 1: HTTP module fetches the post body text
- Step 2: Copy.ai API call — generate LinkedIn snippet
- Step 3: Copy.ai API call — generate email summary
- Step 4: Copy.ai API call — generate tweet thread (5 tweets)
- Output A: Save LinkedIn snippet to a Google Doc or Notion page
- Output B: Create draft in your email tool (HubSpot or ActiveCampaign)
- Output C: Save tweet thread to a Google Sheet for review before posting
You’re not auto-publishing to social media here. That’s a deliberate choice — AI-generated social posts need a quick human scan before they go live — usually under a minute per piece. Everything else runs unattended.
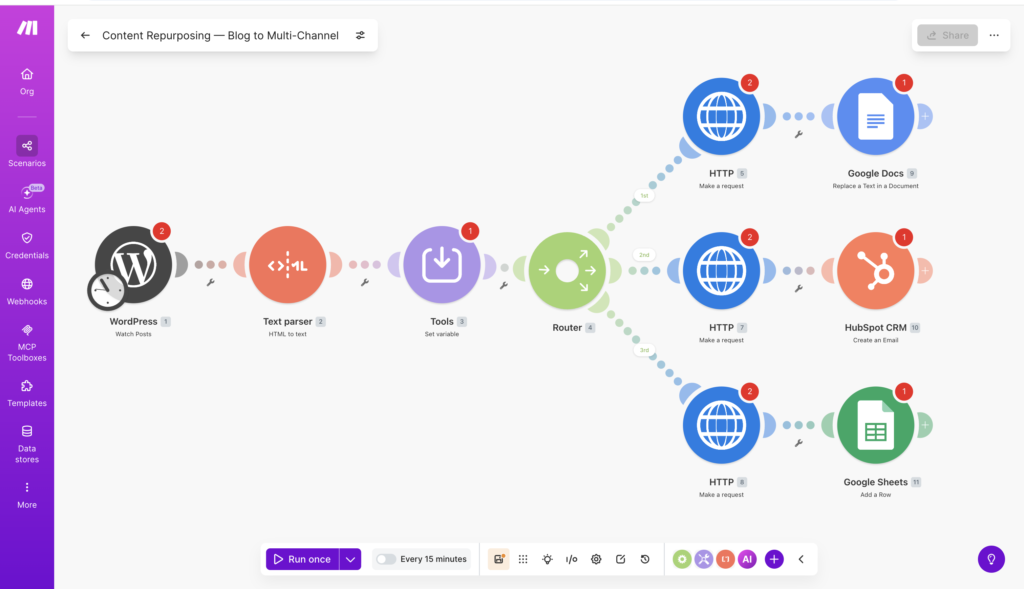
Step 1: Set Up Your Make.com Scenario
Log into Make.com and click Create a new scenario. Name it something you’ll recognise in six months: Content Repurposing — Blog to Multi-Channel.
For the trigger module, search for WordPress and select Watch Posts. Connect your WordPress site using the WordPress connection wizard — you’ll need your site URL and application password (generate this in WordPress under Users → Profile → Application Passwords).
Set the trigger to watch for Published status only. Set the limit to 1 per run during testing, then increase to 5 once you’ve confirmed it works.
If you’re not on WordPress, use Google Sheets → Watch New Rows instead. Create a sheet with columns: Title, Body, URL. Whenever you add a row, the scenario fires. This approach works better if you draft in Notion and paste final copy into the sheet before publishing.
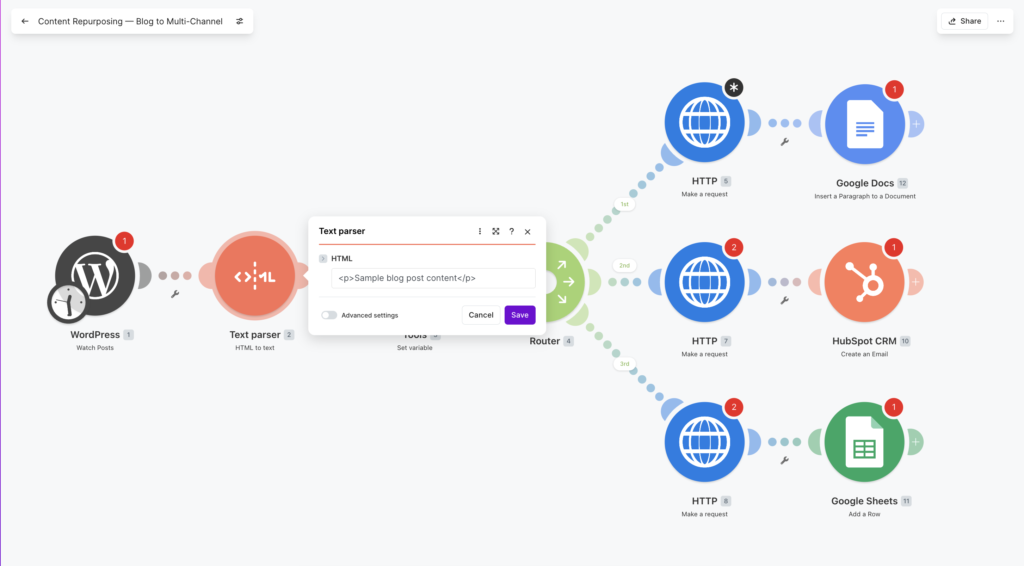
Step 2: Extract Clean Text from the Post
WordPress posts return HTML. Copy.ai doesn’t need HTML — it needs plain text. Add a Tools → HTML to Text module between your trigger and your first API call.
Map the Post Content field from your WordPress trigger into the HTML input. The output will be clean readable text that your AI prompts can process accurately.
Also pull the Post Title from the trigger. You’ll use it in your prompts to give the AI context about the topic.
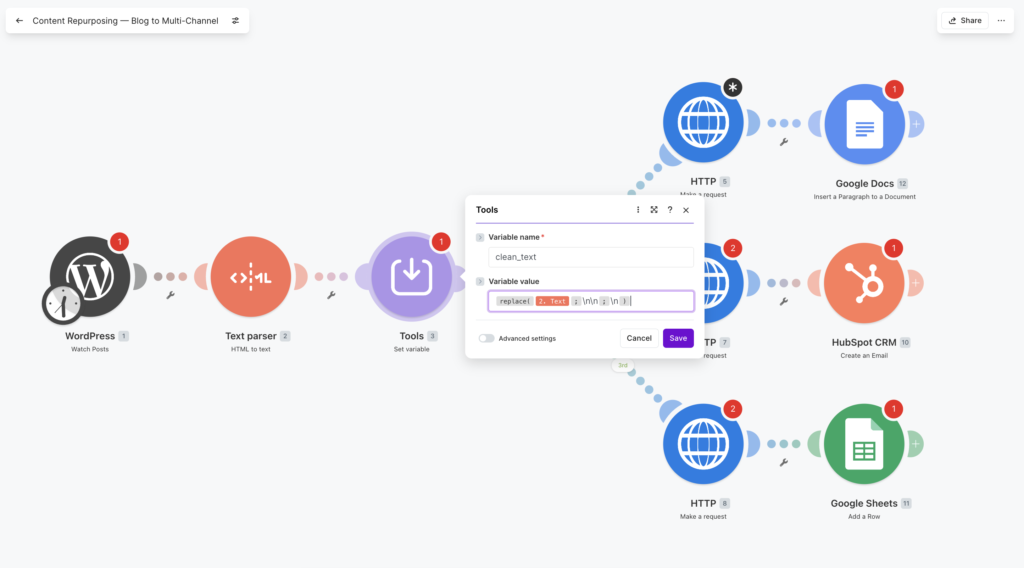
Common error here: The HTML to Text module sometimes outputs text with double line breaks that create weird whitespace in prompts. Fix this by adding a Tools → Set Variable module after it and using the replace function to clean up: replace(clean_text; "\n\n"; "\n"). This prevents the AI from receiving garbled input that produces off-brand outputs.
Step 3: Connect Copy.ai for LinkedIn Snippet Generation
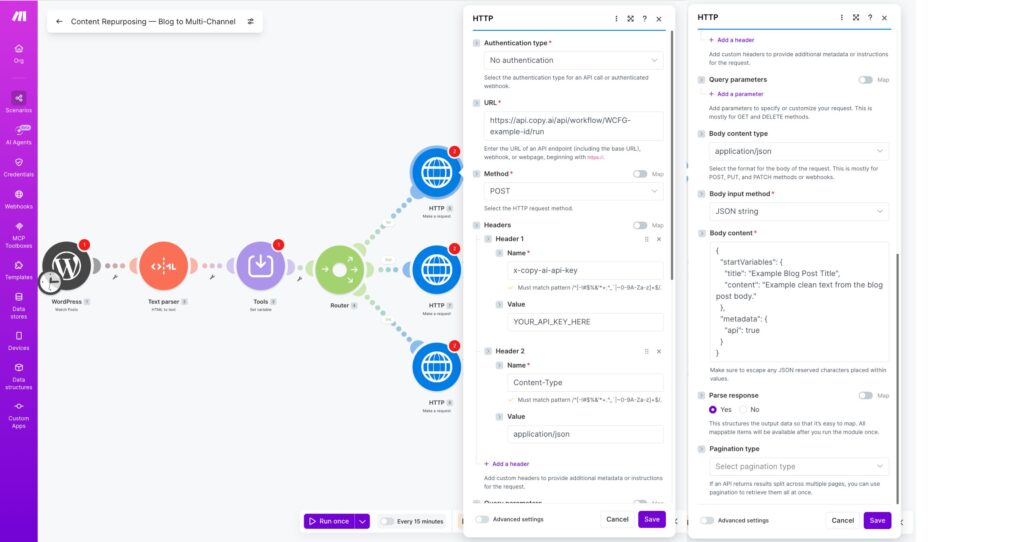
Add an HTTP → Make a Request module. Copy.ai’s Workflows API is straightforward to call directly
Configure it as follows:
- URL:
https://api.copy.ai/api/workflow/<your_workflow_id>/run— find your specific workflow ID in Copy.ai under your workflow → API tab. Workflow IDs start withWCFG-(example:https://api.copy.ai/api/workflow/WCFG-6db59f06-43gh-4ca0-943d-9831cac5ce7b/run) - Method: POST
- Headers:
x-copy-ai-api-key: YOUR_API_KEYandContent-Type: application/json - Body type: Raw (JSON)
For the request body, structure your prompt to be specific. Vague prompts produce generic outputs:
{\n "startVariables": {\n "title": "{{post_title}}",\n "content": "{{clean_text}}"\n },\n "metadata": {\n "api": true\n }\n}If you’re using Copy.ai’s workflow feature (recommended), create a workflow in your Copy.ai account first with a LinkedIn repurposing prompt baked in. Your Make.com HTTP call just sends the variables. The prompt in Copy.ai should instruct it to: write a LinkedIn post under 200 words, open with a strong hook, include one concrete insight from the article, and end with a question to drive comments.
Copy.ai’s workflow builder lets you version-control your prompts separately from your Make.com scenario, which matters when you want to tweak tone without rebuilding the automation.
Step 4: Generate Email Summary and Tweet Thread
Duplicate the HTTP module from Step 3 twice. Update each one to call a different Copy.ai workflow:
Email summary workflow prompt guidance: Write a 150-word email summary of this article. Open with the core problem it solves. Include 3 bullet points of key takeaways. End with a single CTA sentence linking to the full post. Tone: conversational, not formal.
Tweet thread workflow prompt guidance: Write a 5-tweet thread based on this article. Tweet 1 is the hook — one bold claim or surprising fact. Tweets 2-4 each cover one insight from the article in under 280 characters. Tweet 5 is the CTA pointing to the full post. Number each tweet (1/5, 2/5, etc.).
Run these as separate HTTP modules rather than combining them into one request. You get cleaner error handling — if the tweet thread call fails, your LinkedIn snippet and email still save successfully. When you chain everything into one call and it fails, you lose all three outputs.
Step 5: Route Outputs to Their Destinations
Now wire up the three output paths. Use Make.com’s Router module to split into three parallel branches after your AI calls complete.
Branch 1 — LinkedIn to Google Docs: Add a Google Docs → Insert a Paragraph module (or Replace a Text in a Document if you want to overwrite a placeholder section)
Create a standing doc called LinkedIn Content Queue. Map the Copy.ai output plus the post title and date. Each new entry appends to the bottom. Your review workflow is just opening this doc and scheduling posts from it.
Branch 2 — Email Summary to HubSpot: Add a HubSpot → Create Email Draft module. Map the email summary to the body, the post title to the subject line (you’ll edit this before sending anyway). The draft sits in HubSpot waiting for your final review and send. If you’re on ActiveCampaign instead, the module setup is nearly identical.
Branch 3 — Tweet Thread to Google Sheets: Add a Google Sheets → Add a Row module. Columns: Date, Post Title, Tweet 1, Tweet 2, Tweet 3, Tweet 4, Tweet 5, Status (default: “Draft”). Splitting each tweet into its own column makes scheduling with Buffer or Hypefury much faster — you copy-paste tweet by tweet rather than parsing a block of text.
Step 6: Test the Full Scenario
Before running live, test with a published post you already have. Click Run once in Make.com and watch each module execute in sequence. Check the output bubbles at each step.
Things to verify:
- The HTML to Text module is producing clean readable content (click the output bubble and read it)
- Copy.ai is returning actual content, not an error response — a common issue is a malformed JSON body in your HTTP module. Check that your variable names in the body exactly match what Copy.ai’s workflow expects
- The Google Doc is appending, not overwriting
- The HubSpot draft exists in your Drafts folder
- The Sheets row has all 5 tweets in separate columns
Specific error and fix: If your Copy.ai HTTP module returns a 422 Unprocessable Entity error, the most common cause is that your workflow in Copy.ai has input variable names that don’t match what you’re sending in the JSON body. Go into Copy.ai, check the exact variable names your workflow expects (they’re case-sensitive), and update your Make.com HTTP body to match. A mismatch between content and Content will fail silently in the request setup but throw a 422 on execution.
Step 7: Set Your Schedule and Activate
Switch the scenario from manual to scheduled. For most solopreneurs publishing 2-4 times per week, running the scenario every hour is fine — it only triggers when there’s a new post to process, so hourly checks cost almost no operations.
If you’re on Make.com’s free plan, be aware this scenario uses approximately 9-11 operations per run depending on how Make.com counts router branches. On the free tier (1,000 ops/month), you can repurpose roughly 90-110 posts before hitting the limit. The Core plan at $9/month gives you 10,000 ops — more than enough. See the full breakdown in the Make.com Review 2026 for current pricing tiers.
Optimising Your Content Repurposing Workflow Over Time
Once it’s running, the prompt quality in Copy.ai is your main lever. Spend the first two weeks reviewing every output and noting patterns in what’s off. Then update the Copy.ai workflow prompts to fix recurring issues — too formal, too long, wrong CTA format. You’re tuning the prompts, not rebuilding the Make.com scenario.
You can also add a Filter module after the WordPress trigger to only repurpose posts above a certain word count (say, 800 words). Short posts often don’t have enough substance to generate quality repurposed content, and filtering them out saves operations and avoids weak AI outputs cluttering your queues.
If you want to extend this pattern to other content types — YouTube transcripts, podcast show notes, client-facing documents — the same trigger-transform-publish structure applies. The modules change, the logic doesn’t. For client document workflows, the Make.com for Freelancers post covers how to adapt this pattern for client deliverables.
And if you want to automate other parts of your business operations with Make.com beyond content, the automated invoicing workflow pairs well with this — same tool, different problem solved.
What This Workflow Won’t Do
Be honest with yourself about the limits before you ship this:
- It won’t match your exact voice without prompt tuning. Budget 2-3 weeks of edits before outputs are consistently usable without revision.
- It won’t handle posts with heavy technical content well — code snippets and step-by-step instructions confuse the summarisation prompts. Add a filter to exclude tutorial-style posts from the automation if that’s a meaningful chunk of your content.
- It won’t replace the final human scan. Don’t remove your review step. AI-generated social posts occasionally produce factual summaries that miss the nuance of what you actually argued.
Final Build Summary
| Module | Function | Tool |
|---|---|---|
| Trigger | Watch for new WordPress posts | Make.com (WordPress module) |
| Clean | Strip HTML from post body | Make.com (Tools module) |
| Transform x3 | Generate LinkedIn, email, tweet outputs | Copy.ai API via HTTP module |
| Output A | Append LinkedIn snippet to Google Doc | Make.com (Google Docs module) |
| Output B | Create email draft | Make.com (HubSpot module) |
| Output C | Log tweet thread to Google Sheets | Make.com (Google Sheets module) |
The scenario runs in under 30 seconds per post. The first build takes 45 minutes. After that, every blog post you publish automatically stages three channel-ready assets without you doing a single thing.
That’s the trade worth making.