How to Automate Client Reporting with Make.com (Step-by-Step Build)

Here’s how to automate client reporting with Make.com — and cut a 45-minute weekly task down to zero.
This tutorial builds a weekly client report workflow that pulls data from multiple sources, assembles it into a formatted report, and sends it automatically. I’ll show you the exact module setup, where things break, and how to fix them.
What This Workflow Does
Before touching Make.com, here’s the full picture of what you’re building:
- A weekly schedule trigger fires every Monday morning
- The scenario pulls data from a Google Sheet (your client KPI tracker), a connected analytics source via HTTP request, and optionally a project management tool
- A text aggregator or template module assembles the data into a formatted report body
- The report is sent via Gmail or emailed through your preferred provider
- An error handler catches failures and notifies you via Slack or email so nothing disappears silently
You don’t need to use every data source listed. Start with one and expand. The structure is the same regardless of where your numbers live.
What You Need Before You Start
- A Make.com account — the free plan works to build this, but you’ll want the Core plan ($9/mo) for scheduled runs
- A Google Sheet set up with your client data columns (date, metric name, value is enough to start)
- A Gmail or SMTP connection authorized in Make.com
- 10–15 minutes of uninterrupted setup time
If you’re still evaluating whether Make.com is the right tool for your stack, read the Make.com Review 2026 first — it covers pricing tiers and real limitations before you commit.
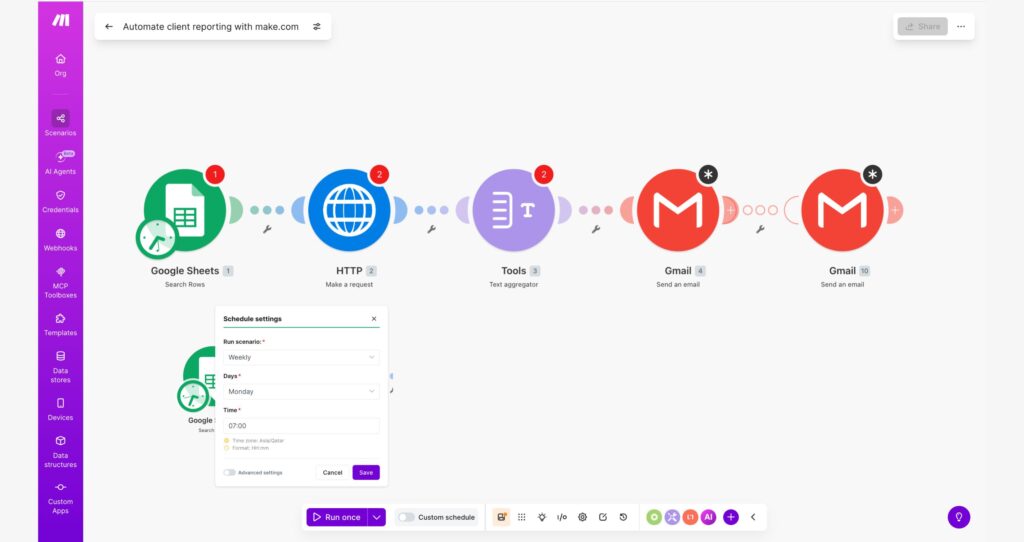
Step 1 — Create Your Automated Client Reporting Scenario in Make.com
Open Make.com, click Create a new scenario, and add your first module.
- Search for and select Schedule as your trigger module
- Set it to run Weekly, on Monday, at whatever time you want the report delivered — 7:00 AM works well
- Click OK to save the trigger
The Schedule module doesn’t pass data — it just fires the scenario. Everything after it is responsible for fetching what you need.
Note on timezone: Make.com runs on UTC by default. If you set 7:00 AM and your client is in EST, that’s 2:00 AM their time. Adjust the hour to match your intended delivery window. This is one of the most common reasons people think their scenario
Step 2 — Pull Data from Google Sheets
Add the next module after your Schedule trigger.
- Search for Google Sheets and select Search Rows
- Connect your Google account if not already authorized
- Select your spreadsheet and the sheet tab containing your client KPI data
- In the Filter field, set it to match the current week — use Make.com’s
{{formatDate(now; "YYYY-[W]WW")}}expression to match a week column if you track by week, or leave the filter empty to pull all rows and filter downstream - Set Maximum number of returned rows to a number that covers your data — 50 is safe for most solo client setups
- Click OK
At this point, run the scenario once manually (click Run once at the bottom) to confirm rows are returning. If you see data bundles flowing out of the Google Sheets module, you’re connected correctly.
Common error here: “Unable to load data” on the spreadsheet selector usually means your Google connection scope doesn’t include Sheets. Disconnect and reconnect the Google auth, making sure to check the Sheets permission box during OAuth.
Step 3 — Pull a Second Data Source via HTTP Request (Optional)
If your client data lives partly in an external tool that has an API — a simple analytics endpoint, a project tracker, or a form tool — add an HTTP Request module after Google Sheets.
- Add an HTTP → Make a request module
- Set Method to GET
- Paste your API endpoint URL
- Add your Authorization header — typically
Bearer {{your_api_key}}— under Headers - Set Response type to JSON
- Click OK and run once to confirm you’re getting a response
If you’re not pulling from a second source yet, skip this step entirely. The rest of the workflow functions with Google Sheets alone.
Step 4 — Aggregate the Data into a Report Body
This is where your raw data becomes a readable report. Use Make.com’s Text Aggregator module.
- Add a Tools → Text aggregator module
- Set the Source module to your Google Sheets module (this tells it which data to loop through)
- In the Text field, build your report row template using mapped variables:
Client: {{1.client_name}}
Week: {{1.week}}
Metric: {{1.metric_name}}
Value: {{1.value}}
---
Replace client_name, week, metric_name, and value with your actual column names as they appear in the variable picker.
- Set Row separator to two line breaks for clean spacing
- Click OK
Run once — the Text Aggregator output should show a single bundle containing your assembled report text. If it’s empty, the Source module mapping is wrong — recheck that the Source module matches your Sheets module number.
Step 5 — Send the Report via Gmail
- Add a Gmail → Send an email module
- Connect your Gmail account
- Fill in the fields:
- To: your client’s email address — or map it from a column in your sheet if you store client emails there
- Subject:
Weekly Report — {{formatDate(now; "MMM D, YYYY")}} - Content: map the output from your Text Aggregator module — this is the assembled report body
- Content type: set to HTML if you want basic formatting, Text if plain text is fine
- Click OK
If you’re not using Gmail, the SMTP → Send an email module works identically — just swap the connection.
Step 6 — Add an Error Handler
This is the step most tutorials skip. Without it, if any module fails — bad API response, Google auth expires, email bounces — the scenario fails silently and your client gets nothing.
- Right-click on any module in your scenario canvas
- Select Add error handler
- Choose Resume if you want the scenario to continue past the error, or Rollback if you want it to stop cleanly
- After the error handler route, add a Gmail → Send an email module (or Slack if you use it) that notifies you:
- To: your own email
- Subject:
Make.com scenario failed — Client Reporting - Content:
The weekly client reporting scenario failed at {{now}}. Log in to Make.com to check the execution log.
Now if anything breaks, you find out immediately instead of discovering a missed report three days later.
Where This Workflow Breaks (And How to Fix It)
Error: Google Sheets returns no rows Usually a filter expression issue. Remove the filter entirely, run once, confirm rows return, then add the filter back incrementally.
Error: Text Aggregator outputs empty bundle The Source module mapping is pointing at the wrong module number. Open the Aggregator settings and reselect the Source module from the dropdown.
Error: Gmail “Invalid credentials” Your Google OAuth token expired. Go to Connections in Make.com, find the Gmail connection, click Verify, and re-authorize.
Error: Scenario runs but report arrives empty The variable mapping in your Text template is referencing column names that don’t match your actual sheet headers. Open the Google Sheets module, click the column fields, and remap from the variable picker instead of typing manually.
Scaling This Workflow
Once the basic version runs cleanly for one client, two additions make it production-ready:
Multiple clients: Add a filter module after Google Sheets that segments by client name. Duplicate the Gmail module for each client with their specific email. Or store client emails in the sheet and map them dynamically — one send module handles everyone.
Richer data: Plug in additional HTTP Request modules before the Text Aggregator to pull from more sources. Each one feeds into the Aggregator as another mapped variable.
PDF delivery: Replace the Gmail text body with a Google Docs module that writes the report to a template doc, then attach it as a PDF. More setup, but professional for client-facing delivery.
For the invoicing equivalent of this workflow — automating payment confirmations and invoice sends — see How to Automate Invoicing with Make.com.
Affiliate CTA
Make.com’s Core plan at $9/month covers scheduled scenarios and everything in this build. Start free — no credit card required — and upgrade when you’re ready to run on a schedule.
For a broader look at what Make.com can handle across your business, Make.com for Freelancers covers the full workflow stack worth building.
Want to automate the content side of your business the same way? How to Automate Content Repurposing shows the same build approach applied to your publishing workflow.
[mailerlite_form form_id=1]