How to Automate Email Follow-Ups with Make.com (Complete Workflow, No Zapier)
What You’re Building
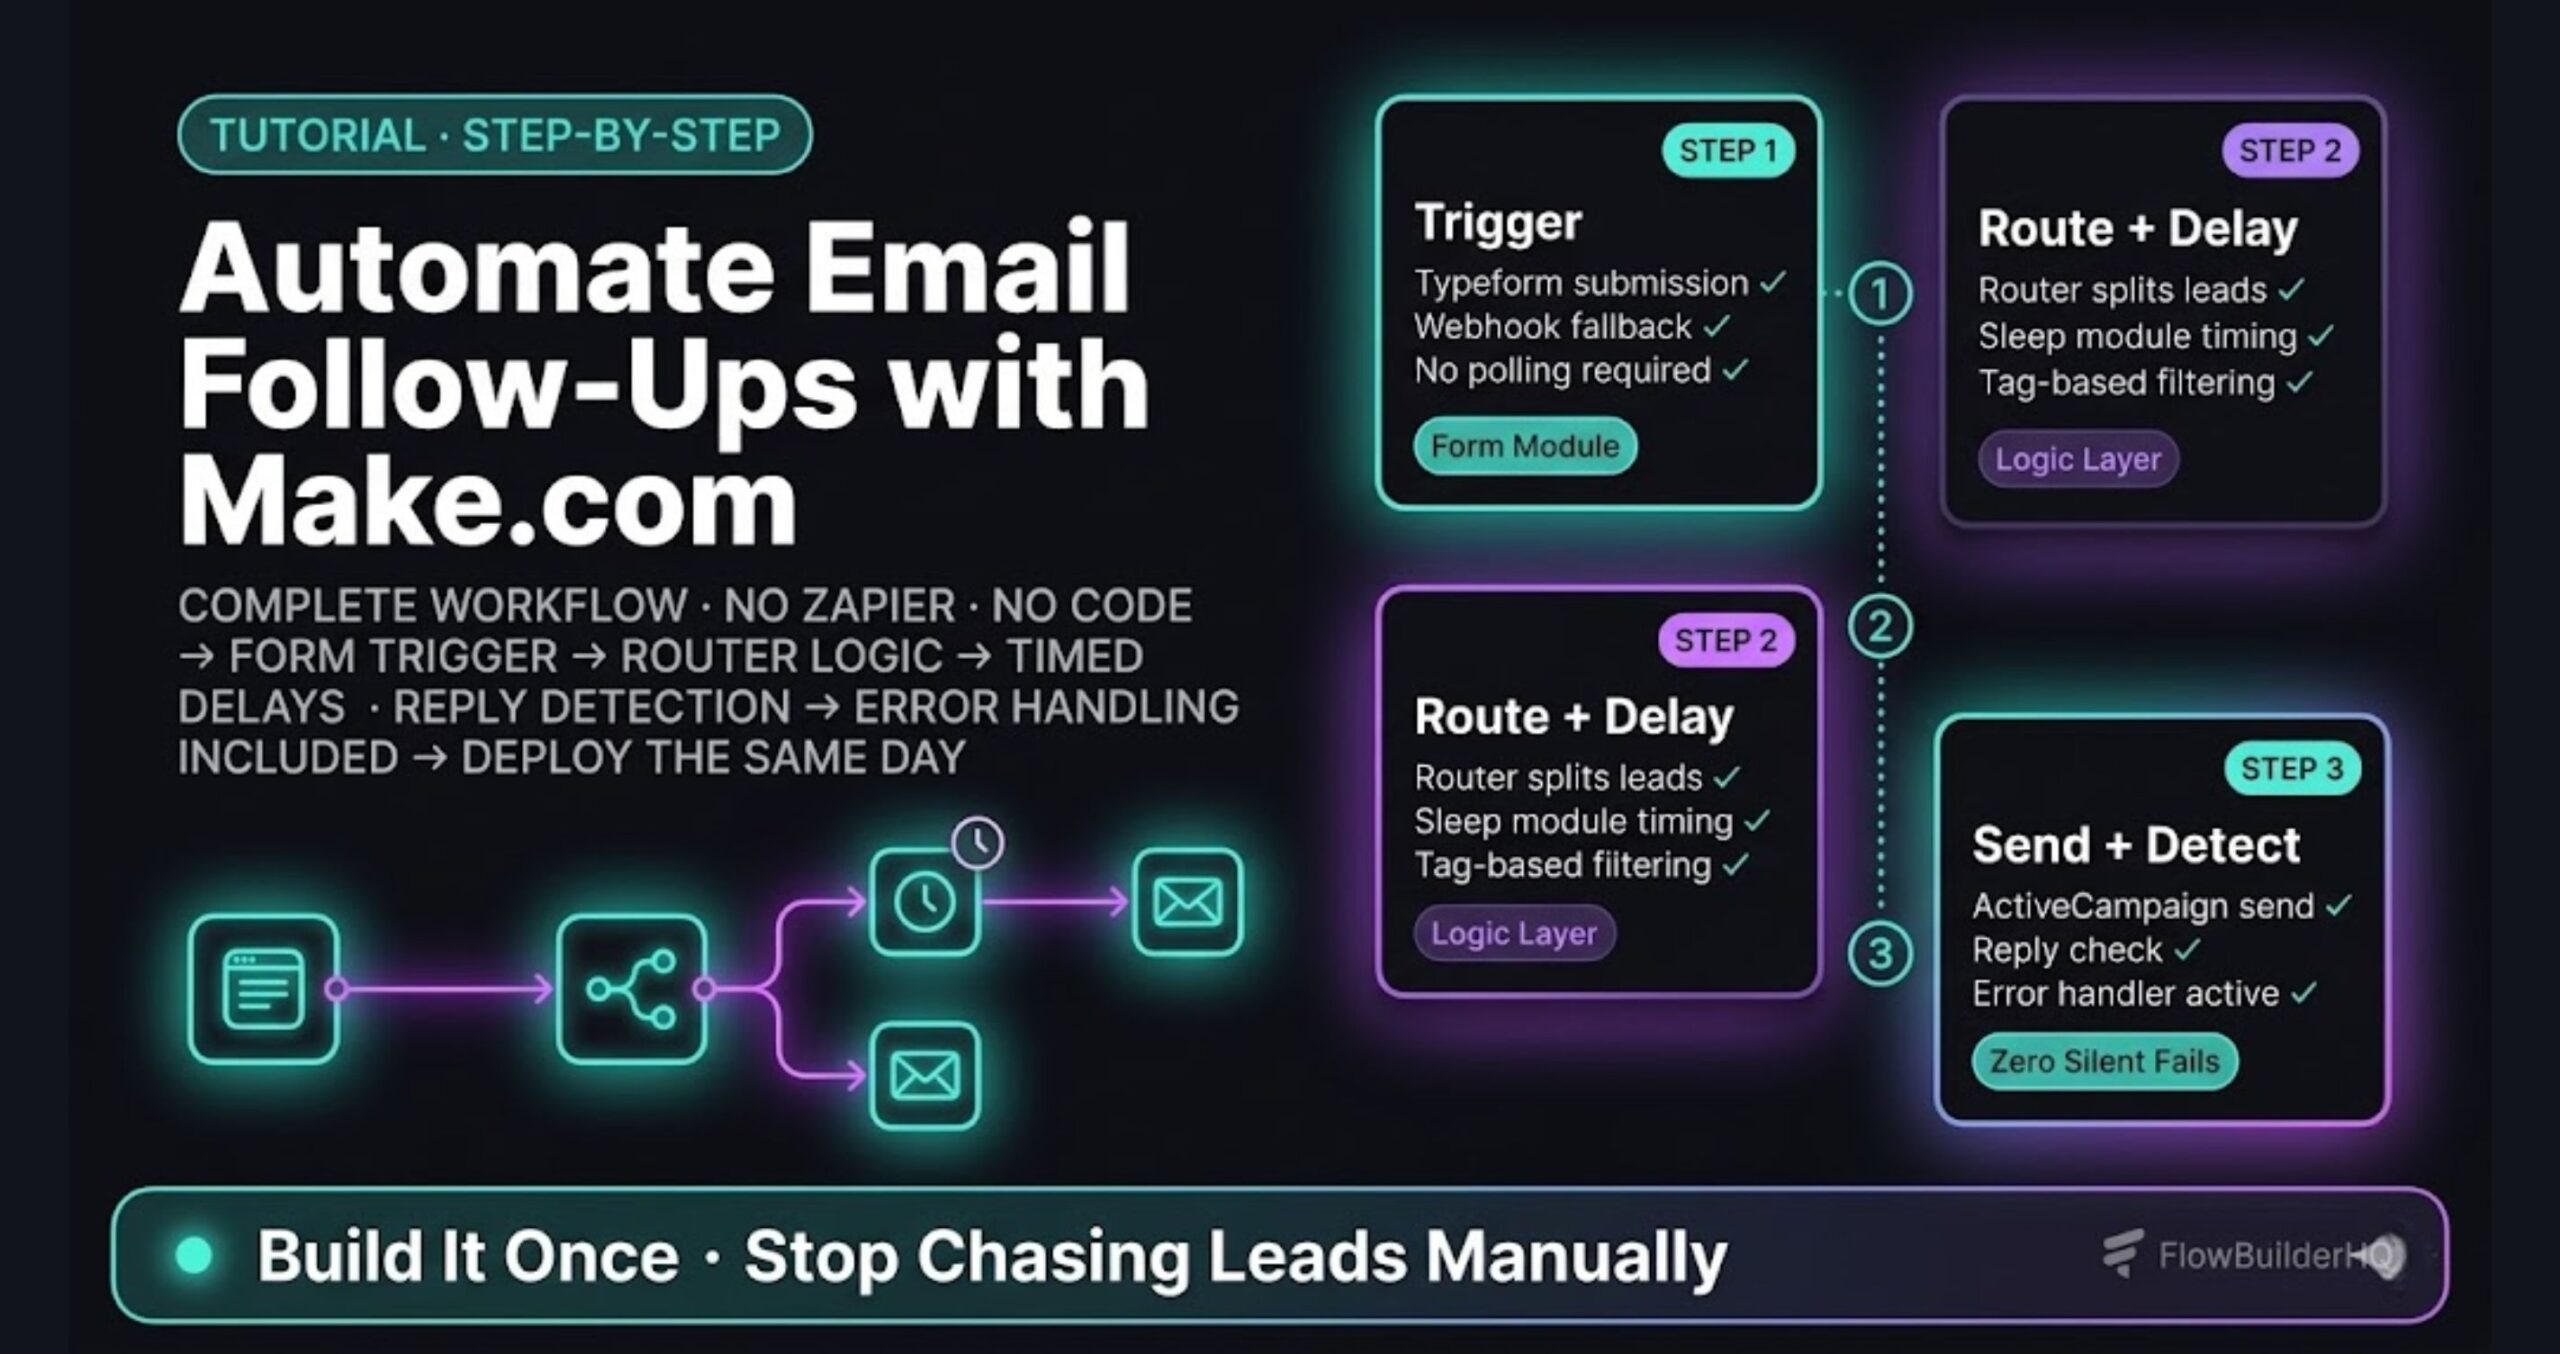
This tutorial shows how to automate email follow-ups with Make.com — a complete workflow triggered by a form submission, routed through logic, and timed to send a sequence of follow-up emails without you touching anything. No Zapier. No code. No babysitting.
The workflow handles three things most solopreneurs do manually: capturing a lead, sending an immediate first email, and queuing timed follow-ups based on whether the person responded. By the end, you’ll have a working scenario you can deploy the same day.
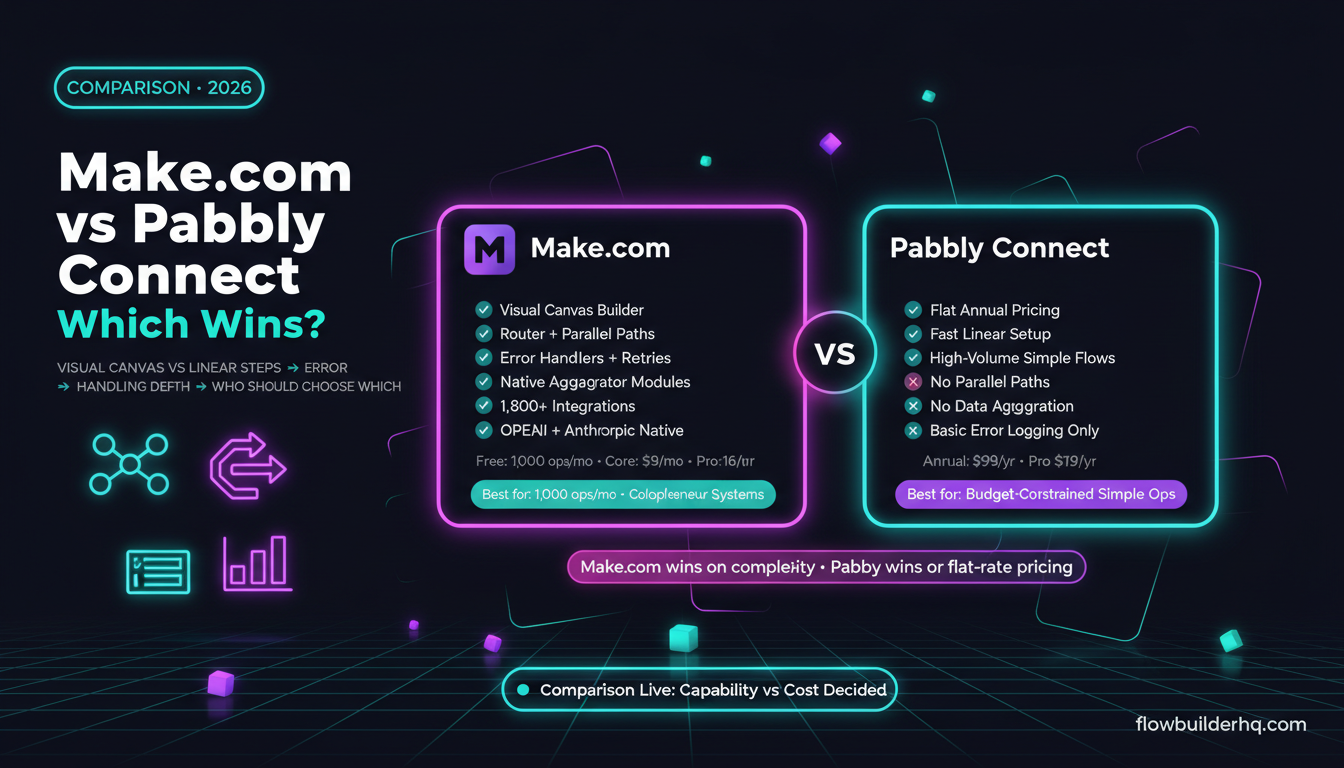
If you want a broader look at what Make.com can do before building, start with the Make.com Review 2026 — it covers pricing tiers, operation limits, and what breaks when you scale.
Tools Used in This Workflow
- Make.com — scenario builder, scheduling, routing logic
- ActiveCampaign — contact management and tagged segmentation
- Typeform or your existing form tool — trigger source
- Gmail or SMTP module — for sending if you’re not on ActiveCampaign yet
ActiveCampaign is the cleaner long-term choice here because it handles contact deduplication, tagging, and unsubscribes natively. If you’re not on it yet, Gmail works for testing — just know you’ll hit limits fast at volume.
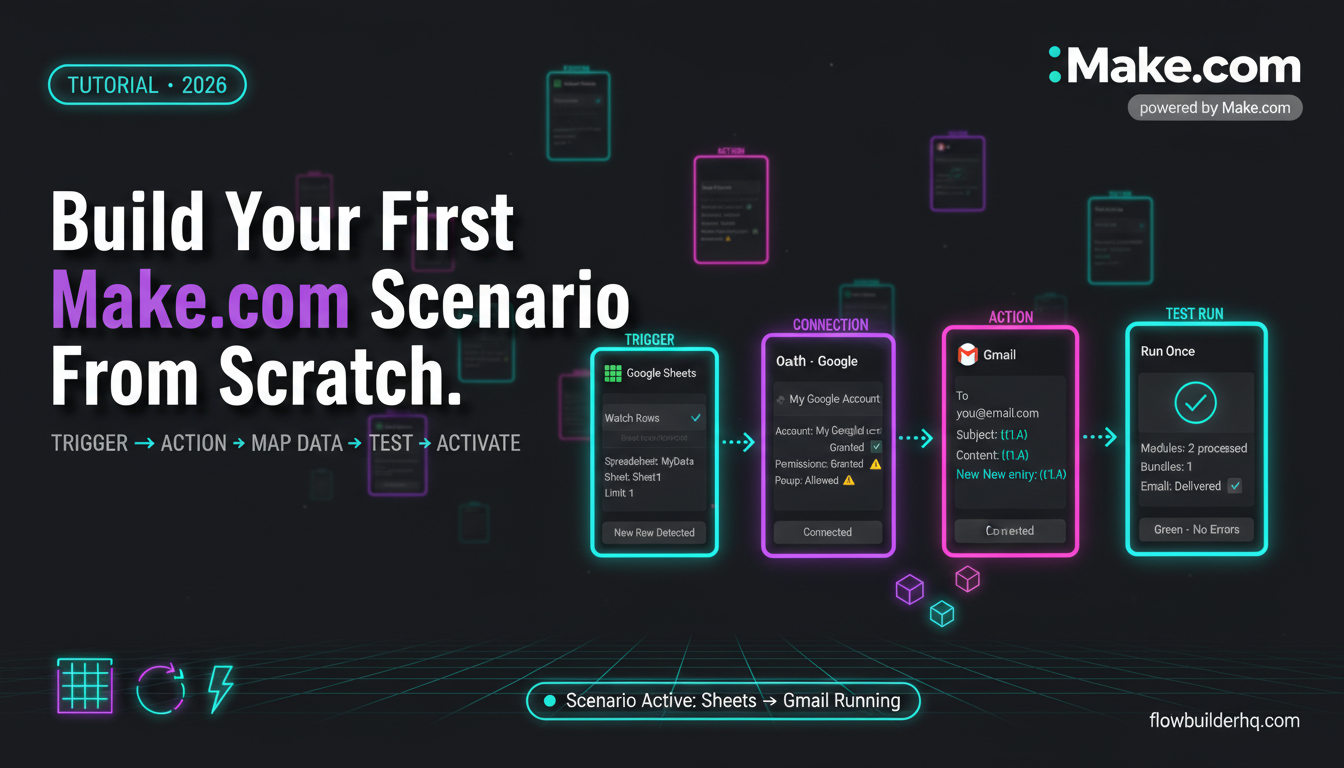
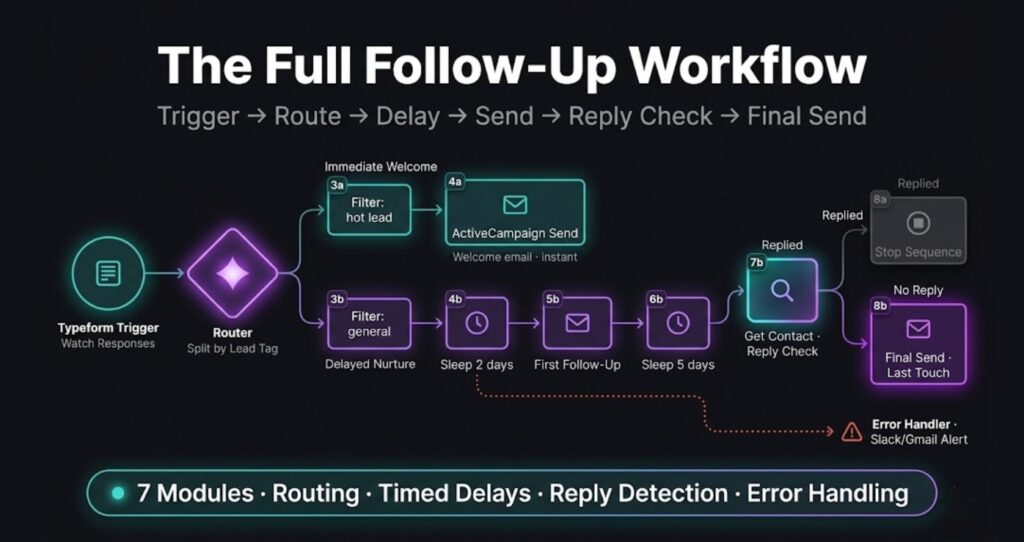
How to Automate Email Follow-Ups with Make.com: The Scenario Structure
Make.com calls each automation a scenario. This one uses a linear structure with a router, two paths, and a scheduled delay module. Here’s the architecture before we build it:
- Trigger: Typeform new submission (or Webhooks module if your form tool isn’t listed)
- Module 2 — Router: splits into two paths based on whether the form submission includes a specific tag or field value (e.g., “interested in service A” vs “general inquiry”)
- Path A — Immediate send: triggers an instant welcome email through ActiveCampaign or Gmail
- Path B — Schedule follow-up: uses Make.com’s Sleep or Scheduler module to wait 2 days, then sends a follow-up
- Module 5 — Conditional check: looks up the contact in ActiveCampaign to see if they’ve replied or opened the first email
- Module 6 — Final send: if no reply after 5 days, sends a third “last touch” message
- Module 7 — Error handler: catches failures and notifies you via Gmail or Slack so the sequence doesn’t die silently
You don’t need every module on day one. Start with the trigger, one path, one send. Layer in routing and delays after the first version works.
Step 1 — Set Up the Typeform Trigger
- Open Make.com → Create a new scenario
- Add a Typeform → Watch Responses module as your trigger
- Connect your Typeform account (OAuth — takes 10 seconds)
- Select the specific form you want to trigger from
- Click OK and run once to confirm submissions are flowing into the scenario
If your form tool isn’t natively supported (Tally, Fillout, custom HTML forms), use Webhooks → Custom webhook instead. Copy the webhook URL Make generates and paste it into your form tool’s webhook field. Submit a test entry and verify the data lands in Make.
Common error here: Typeform OAuth fails on the first try if your browser blocks third-party cookies. Try in a private window if the connection won’t authorize.
Step 2 — Add the Router
The router is what makes this scenario actually useful — without it, you’re just sending one email to everyone.
- Click the + after the Typeform module
- Search for Flow Control → Router and add it
- The Router gives you two output paths by default — that’s what you want
The Router doesn’t need configuration itself. The logic lives on the paths leaving it.
Step 3 — Configure Path A (Immediate Welcome)
This path fires immediately on form submission for hot leads.
- Click the wrench icon on the top path leaving the Router → Set up filter
- Set the condition: a field from your form (like
interest_level) equals a specific value (likeservice-aorhot) - Add a module after the filter: ActiveCampaign → Add or Update Contact
- Map the form fields to ActiveCampaign contact fields (email is required, name and tag are recommended)
- Add a tag in the ActiveCampaign module:
lead-immediate-welcome(this lets you trigger ActiveCampaign’s own automation if you’d rather offload sending)
If you’re using Gmail instead of ActiveCampaign for now:
- Add a Gmail → Send an email module after the filter
- To field: map the email from the Typeform module
- Subject:
Thanks for reaching out — quick note inside - Content: keep it short, 3–4 sentences, with a clear next step
Run the scenario once with a real test submission to confirm the immediate email lands.
Step 4 — Configure Path B (Delayed Follow-Up)
This path handles general inquiries that need a slower nurture.
- Click the wrench on the second path leaving the Router → Set up filter
- Set the condition: form field equals the other value (
generalorcold) - Add a Tools → Sleep module after the filter
- Set the delay to 172800 seconds (that’s 2 days)
- Add an ActiveCampaign → Add or Update Contact module (or Gmail Send) after the Sleep
Important note on Sleep: Make.com’s Sleep module pauses the scenario execution, which means it counts against your active scenario time. For delays longer than a few hours, the cleaner approach is to use Tools → Set Variable to record a send_at timestamp, then schedule a separate scenario that polls daily and sends when the time arrives. For a build this size, Sleep is fine. If you scale to hundreds of leads/day, refactor.
Step 5 — Add the Conditional Reply Check
This is what separates a basic drip from a real follow-up sequence.
- After Path B’s first send, add a Sleep module set to 432000 seconds (5 days)
- Add an ActiveCampaign → Get a Contact module
- Map the contact email from the original form submission
- Add a Flow Control → Router after Get a Contact
- On one path, set a filter:
last_reply_dateis empty (no reply received) - On the other path, set a filter:
last_reply_dateis not empty (reply received — stop the sequence)
If using Gmail only (no ActiveCampaign), this check is harder — Gmail’s API doesn’t expose reply data cleanly. The workaround is to use a Google Sheet as a tracking layer: every send logs to a sheet, and a separate scenario watches your inbox for replies and updates the sheet.
Step 6 — Final Send (No-Reply Path)
- On the “no reply” branch, add another ActiveCampaign → Add or Update Contact (or Gmail Send)
- Subject:
Last note — should I close your file? - Content: short, direct, gives them an easy out or a low-friction yes
This message converts better than a fourth “checking in” email because it creates a soft deadline. Most replies to a follow-up sequence come on the final touch — don’t skip it.
Step 7 — Add the Error Handler
This is the step most tutorials skip. Without it, a single failed module kills the whole sequence and the lead disappears into nothing.
- Right-click any module → Add error handler
- Choose Resume if you want the scenario to continue past the error
- After the error handler route, add a Gmail → Send an email module:
- To: your own email
- Subject:
Follow-up scenario failed — needs attention - Content:
Scenario failed at {{now}} for {{1.email}}. Check Make.com execution log.
Now if anything breaks, you find out the same day instead of two weeks later when a lead asks why you ghosted them.
Where This Workflow Breaks (and How to Fix It)
Error: Router sends submissions down both paths Filters are missing or set to “OR” logic when they should be “AND.” Open both wrench icons and confirm exclusive conditions.
Error: ActiveCampaign module fails with “Contact not found” Use Add or Update Contact, not Get a Contact, on first touch. Get only works if the contact already exists.
Error: Sleep module hits Make.com’s max wait time Sleep tops out at one hour on Free and Core plans for safety. For longer delays, switch to a scheduled scenario architecture (separate scenario that polls a date field).
Error: Emails land in spam Sending from Gmail at volume = deliverability problems fast. ActiveCampaign (or any dedicated sending platform) solves this. Don’t try to scale Gmail past a few dozen sends per day.
Scaling This Workflow
Once one path runs cleanly, three additions make it production-ready:
Multi-step nurture: Add more Sleep + Send pairs along Path B. Each one fires only if the reply check still shows no response. Cap at 5 touches — past that, you’re annoying, not following up.
Tag-based routing: Add more router paths for different lead types (hot, warm, cold, partner inquiry). Each gets its own sequence cadence. The architecture stays the same — you just duplicate the path pattern.
Reply detection across channels: If your leads sometimes reply via LinkedIn, WhatsApp, or call, the email-only reply check misses them. Add a manual “stop sequence” tag in ActiveCampaign that you can apply when a reply comes through any channel, and filter it into the Get a Contact step.
For more advanced Make.com workflows, see How to Automate Invoicing with Make.com — it covers payment confirmations and invoice sends using the same architectural pattern.
Try ActiveCampaign
ActiveCampaign’s Starter plan at $15/mo handles the contact management and tagging this workflow depends on. Worth it the moment you outgrow Gmail-based sending.
Try ActiveCampaign free for 14 days → (affiliate link pending approval — placeholder)
Try Make.com
Make.com’s Core plan at $9/month covers everything in this build — scheduled scenarios, routers, sleep modules, error handling. Start free, no credit card required.
For the freelancer angle specifically, Make.com for Freelancers covers how to structure client scenarios and what billing looks like in a real services business.
Want to automate the content side of your business the same way? How to Automate Content Repurposing shows the same build approach applied to your publishing workflow.