How to Use Make.com with Google Calendar to Automate Scheduling Workflows
If you live in Google Calendar, you already know the problem: a new event appears, and suddenly you’re manually firing off a prep email, updating a spreadsheet, logging the meeting in your CRM, and maybe sending a reminder to a client. Every time. For every event.
This tutorial shows you how to use Make.com with Google Calendar to automate scheduling workflows so that the calendar event itself becomes the trigger for everything downstream. Not just booking links — actual logic that runs when a meeting hits your calendar.
This is different from what most scheduling automation posts cover. If you’ve already set up a Calendly booking page, that’s one layer. What we’re building here sits on top of Google Calendar directly — catching events regardless of how they were created, and firing off actions that actually prepare you for the work.
What You’ll Build
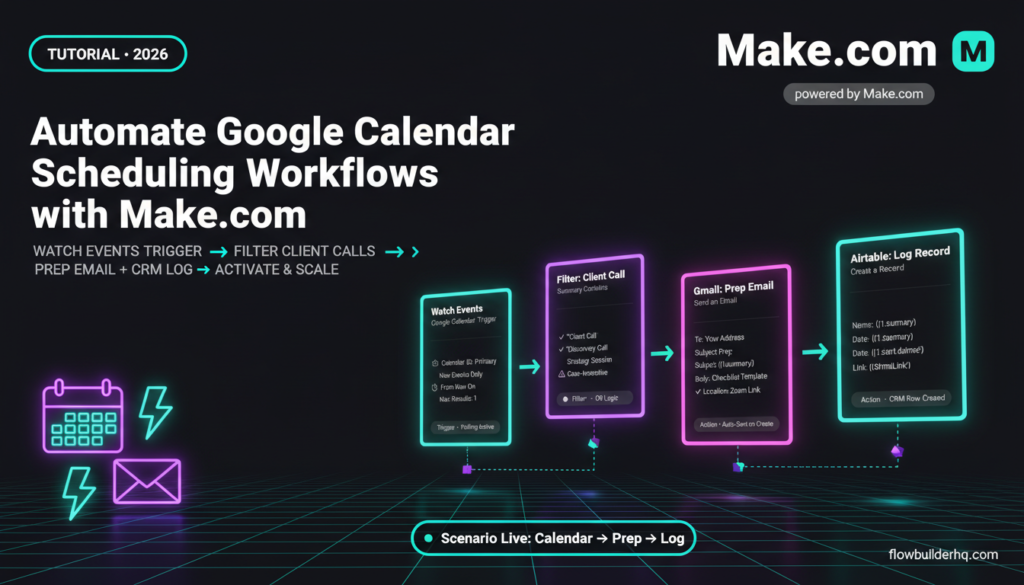
By the end of this tutorial, you’ll have a Make.com scenario that:
- Watches a specific Google Calendar for new or updated events
- Filters for events matching specific criteria (e.g., event title contains “Client Call”)
- Sends a personalized prep email to yourself via Gmail
- Creates or updates a record in your CRM or Airtable
- Optionally sends a confirmation message to the client via email
This is a real, functional workflow — not a toy demo. You’ll see exact module settings, the one error that trips up almost everyone on the Google Calendar trigger, and how to fix it.
Before You Start: What You Need
- A Make.com account (the free tier handles this workflow fine at low volume)
- A Google account with Google Calendar active
- A Gmail account connected to Make.com
- Optionally: an Airtable or HubSpot account for the CRM step
Make.com’s free plan gives you 1,000 operations per month — more than enough if you’re running 10–30 client calls a month. If you scale up, Core is $9/mo. If you’re not sure whether Make.com is the right tool for your stack overall, this decision framework will help you decide before you commit.
Step 1: Create a New Scenario in Make.com
Log in to Make.com and click Create a new scenario. You’ll land on the visual canvas. Click the large + to add your first module — this will be your trigger.
Search for Google Calendar and select it. From the list of triggers, choose Watch Events. This trigger polls your Google Calendar at a set interval (you’ll define this) and fires whenever a new event is detected.
Connect your Google account. Make.com will request OAuth permissions. Grant calendar read access. If you manage multiple Google accounts, be deliberate about which one you connect here — a common mistake is connecting the wrong account and then wondering why no events fire.
Step 2: Configure the Google Calendar Watch Events Trigger
Once connected, you’ll see the module settings. Here’s what to configure:
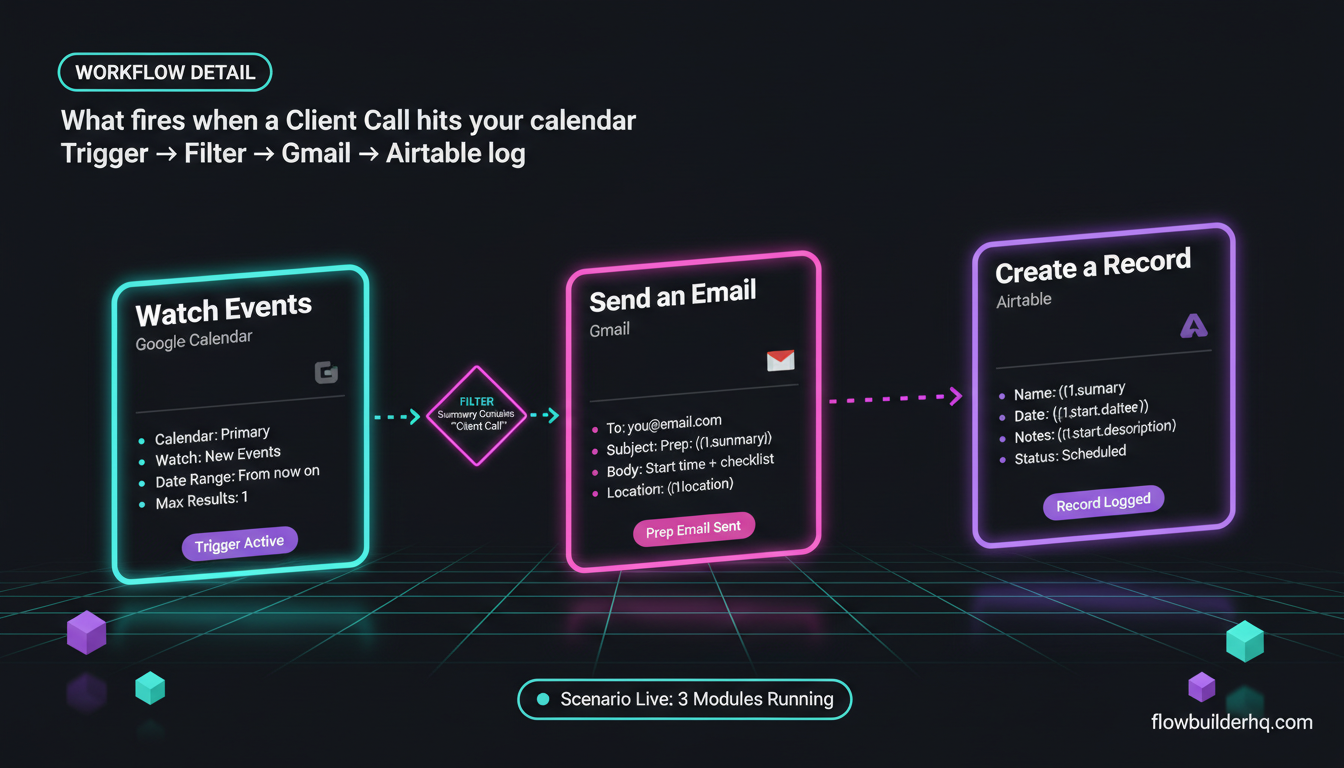
- Calendar ID: Select the specific calendar you want to watch. If you use a dedicated “Client Calls” calendar, select that. If everything lives on your primary calendar, select “Primary”.
- Watch: Set to New Events (not “All Events” — unless you also want updates to trigger the scenario, which you don’t for this workflow).
- Date range start: Set to From now on. This tells Make.com to only look at events created after the scenario activates, not pull in your entire history.
- Max results: Set to 1. Make.com processes bundles, and setting this too high can cause unexpected batch processing behavior on the first run.
The error everyone hits first: When you click “Run once” to test, Make.com will tell you it found no events — even if your calendar has upcoming events. This happens because the Watch Events trigger is looking for events created after the scenario’s checkpoint time, not events that already exist. Fix: manually create a test event in Google Calendar after clicking “Run once,” then refresh. Make.com will pick it up on the next poll cycle.
If you’re new to the Make.com canvas and want to understand how triggers, filters, and routes work together, this walkthrough of multi-step scenario structure is worth reading before going further.
Step 3: Add a Filter for Event Type
You don’t want every calendar event triggering your prep workflow — a dentist appointment shouldn’t fire a client CRM update. Add a filter between the trigger and the next module.
Click the small circle between the trigger and the next module to add a filter. Set it up like this:
- Label: “Is a Client Call”
- Condition:
Summary(the event title) ContainsClient Call
Adjust the keyword to whatever you consistently use in your event titles. If you use a consistent prefix like “[C]” for client events, filter on that. The filter is case-sensitive by default in Make.com — use the “Contains (case-insensitive)” operator if your naming is inconsistent.
You can add multiple conditions with AND/OR logic. For example, filter for events that contain “Client Call” OR “Discovery Call” OR “Strategy Session” — any naming convention you use.
Step 4: Send a Prep Email to Yourself via Gmail
Now add the first action module. Click + after the filter and search for Gmail. Choose Send an Email.
Configure it:
- To: Your own email address (hard-code it or map it from a data store)
- Subject:
Prep: {{1.summary}} — {{1.start.dateTime}} - Body: Build a useful template. Example:
Client call starting at {{1.start.dateTime}}

Event: {{1.summary}}
Description: {{1.description}}
Location/Link: {{1.location}}

--- Prep Checklist ---
[ ] Review last call notes
[ ] Check invoice status
[ ] Confirm agenda
The {{1.xxx}} syntax pulls data from the Google Calendar trigger (module 1). Map in whatever fields are most useful. If you put the Zoom link in the event location field, {{1.location}} will surface it in your prep email automatically.
Timing: This email fires when the event is created in Google Calendar, not when the event starts. That’s intentional — you want prep time before the call. If you need the email to fire at a specific time before the event (e.g., 1 hour before), you’ll need a more advanced approach using Make.com’s scheduling + a delay module, which is beyond this tutorial’s scope but covered in the coaching and consulting automation workflow post.
Step 5: Log the Event to Airtable (or Your CRM)
The next action creates a record so you have a log of every client interaction. This is where your calendar becomes a data source, not just a schedule.
Add a new module after the Gmail step. Choose Airtable → Create a Record (or HubSpot → Create/Update a Contact or Activity, depending on your stack).
For Airtable, map these fields:
- Name:
{{1.summary}} - Date:
{{1.start.dateTime}} - Notes:
{{1.description}} - Status: Hard-code “Scheduled”
- Calendar Link:
{{1.htmlLink}}
If you’re using HubSpot, the equivalent is logging an activity on a contact record. The Make.com to HubSpot integration tutorial walks through that connection in detail — the auth setup is the part that catches most people.
For Airtable specifically, if you’re already using it as a project management layer, check out how Make.com and Airtable work together as a lightweight database — it covers base structure and field types that make automation cleaner.
Step 6: Optional — Send a Client Confirmation Email
If you want to send a confirmation to the client when the event hits your calendar, you need the client’s email address. Two options:
Option A: The client is an attendee on the event. Make.com’s Google Calendar trigger returns the attendees array — map {{1.attendees[].email}} to a Gmail “Send Email” module. You’ll want to add a filter ensuring the attendee is not yourself (filter: attendee email does not equal your email).
Option B: The client email is in the event description. Use a Make.com Text Parser module with a regex to extract the email, then pass it to Gmail. This is messier but works if you have a consistent description format like “Client: client@email.com”.
Option A is cleaner. If you’re already sending calendar invites to clients, go that route.
Step 7: Set the Scenario Schedule and Activate
Click the clock icon at the bottom left of the scenario canvas to set the polling interval. For a scheduling workflow, every 15 minutes is responsive enough for most solopreneurs. If you need near-real-time triggering, set it to every 5 minutes — but that burns more operations.
At 15-minute intervals, this scenario uses roughly 2,880 operations per month just on the trigger checks (even when no events fire). Add ~3 operations per event that actually fires. On Make.com’s free plan (1,000 ops/month), you’ll need to either reduce the polling interval or upgrade to Core at $9/mo if you want 15-minute checks running continuously.
Once the schedule is set, click Activate (the toggle at the bottom). The scenario is now live.
Handling the Most Common Errors
Error: “Unable to load calendar list” — This usually means the OAuth token expired or the wrong Google account is connected. Re-authenticate the connection in Make.com’s Connections panel.
Error: Scenario fires but Gmail module fails with “Invalid recipient” — Check that your “To” field is mapping a valid email string, not an object. If you’re using the attendees array, the mapping should be to the .email property specifically.
Error: Airtable module returns “Field type mismatch” — Make.com sends date-time values in ISO 8601 format. Airtable’s date field accepts this, but if your field is typed as “Single line text” instead of “Date,” it’ll reject it. Change the Airtable field type to Date.
If your scenario starts misbehaving after changes, the Make.com error handling guide covers how to set up error routes so failures don’t silently kill your workflow.
How to Use Make.com with Google Calendar: Extending This Workflow
Once the base scenario is running, there are natural extensions that compound the value:
- Add a router to branch logic by event type — “Discovery Call” triggers a different email template than “Weekly Check-in”
- Connect to Notion to auto-create a meeting notes page for each call. The Make.com + Notion integration guide shows the exact module setup
- Trigger invoice prep for calls marked as billable — pair this with the invoice and payment tracking workflow to close the loop
- Log to Google Sheets for a running call history. The Google Sheets reporting automation guide covers how to append rows cleanly without overwriting
You can also add a Make.com webhook trigger on the other side — so when your client fills out a pre-call form, it creates the Calendar event AND kicks off this scenario simultaneously. That’s the full loop: intake form → calendar event → prep email → CRM log → client confirmation. No manual steps.
Why This Beats a Booking-Link-Only Approach
Tools like Calendly handle the booking side well. But they only fire automations when someone books through their link. If you add a client call manually, reschedule directly in Google Calendar, or block time for a call that came in via email — Calendly never knows it happened.
Watching Google Calendar directly catches everything. It’s the source of truth for your schedule, regardless of how events get there. The appointment scheduling automation post covers the Calendly integration side if you want both layers running together.
For a broader look at where calendar automation fits in your overall automation stack, the solopreneur workflow automation prioritization framework is worth a read — it helps you sequence what to build and in what order so you’re not automating things that don’t actually cost you time.
The official Make.com Google Calendar documentation covers every available field from the trigger module — useful when you want to build more advanced filtering on event properties like attendees, recurrence rules, or color codes.
And if you want to understand the full range of Google Calendar’s API data structure, the Google Calendar Events API reference shows every field Make.com can surface — including some non-obvious ones like extendedProperties that you can use as metadata tags for routing logic.
Final Notes on Operations and Scaling
At Make.com Core ($9/mo, 10,000 ops/month), this scenario runs comfortably even at 5-minute intervals with dozens of weekly client calls. The operations math: polling every 15 minutes = ~2,880 trigger checks/month. Each successful event fires ~4–6 ops depending on how many modules run. At 40 client calls/month, that’s roughly 3,040–3,120 total ops — well within Core limits.
If you’re comparing Make.com’s cost against Zapier for this kind of scenario, the pricing breakdown at different operation volumes makes the case clearly. Zapier’s equivalent plan costs significantly more for the same trigger volume.
Build it once. Every new client call on your calendar triggers the prep, the log, and the confirmation automatically. That’s the point.
Building this yourself? Get the workflow pack.
5 ready-to-import n8n workflows — lead capture, invoicing, content repurposing, onboarding, social posting. Free.